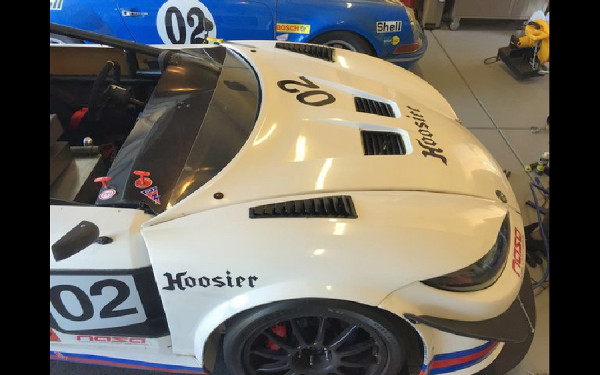
BEAVIS' White Track Car

Chat to do with your MX5/Miata/Eunos Garage Ride(s).

Moderators: timk, Stu, -alex, miata, StanTheMan, greenMachine, ManiacLachy, Daffy, zombie, Andrew, The American, Lokiel

ianoz
Fast Driver
Posts: 163
Joined: Sat Sep 21, 2013 8:52 pm
Vehicle: NA6
Location: SE Melb, Vic

Re: BEAVIS' White Track Car

Postby ianoz » Tue Oct 24, 2017 10:54 pm

looking forward to it :D
I've seen some lightweight LiFePo4 batteries for motorbikes that look interesting - like normal car batteries shrunk down rather than the RC model style. Intended for auto charging systems, so shouldn't be any issues there. tiny size and weight for the power they pack.

If the strain is with starting, then maybe an anderson plug to an external booster battery for cranking to take the load off it?
NA6 '89 red, NB8B '01 silver

User avatar
beavis
Forum sponsor
Posts: 1405
Joined: Mon Feb 02, 2009 12:31 pm
Vehicle: NB8B - Turbo
Location: Melbourne

Re: BEAVIS' White Track Car

Postby beavis » Wed Oct 25, 2017 1:14 am

ianoz wrote:If the strain is with starting, then maybe an anderson plug to an external booster battery for cranking to take the load off it?

That's pretty much exactly what i'm doing :) :BROADY:
Turbo NB Build Thread | BeavisMotorsport.com | YouTube.com/bbeavis | Cars: NA6, NA8-VVT, NB-Turbo, ND-2L

User avatar
beavis
Forum sponsor
Posts: 1405
Joined: Mon Feb 02, 2009 12:31 pm
Vehicle: NB8B - Turbo
Location: Melbourne

Re: BEAVIS' White Track Car

Postby beavis » Wed Oct 25, 2017 11:23 pm

How about that update on the Track NB that I've been owing you all for oh so long? Well here it is!

So finally back onto the Turbo track car.... and first up, I thought it would be fun to post up a video I put together of what it's like trying to start a car for the first time in about 2 years after an excessive collection of changes have occurred to the poor thing.
The cars had a lot of changes between running from ecu retunes to turbo installs to new ignition system to completely different injectors to a change in the entire intake system. You can probably predict roughly how it goes.


The cause of the start issues ended up being simple, in reworking the wiring for the ignition I had to donate some of my wiring loom to another car for a short while and in the process, the pinout on the deutsch connector for the coil packs had been switched... resulting in Cyls 1&4 firing when 2&3 should have been, and vice versa.
Image
Image

Moving on, one of the breather lines was annoyingly close to the dipstick, and if you know anything about these cars, you know the dipstick handle is made of faberge egg... if you even just think about touching the dipstick it breaks.
So to try keep the hose away from the dipstick, I found a spare 45deg bend AN fitting and it made such a simple thing seem so satisfying. Not strictly necessary, but it made me feel good.
Image
Image
Image

Regarding the forementioned battery from a few posts ago, I ended up designing a mounting bracket, and hooking the thing up to an anderson connector for easy disconnects or to attach a jumper pack etc. Mounted up under the dash so battery cabling is all very short and should save a nice amount of weight.
Image
Turbo NB Build Thread | BeavisMotorsport.com | YouTube.com/bbeavis | Cars: NA6, NA8-VVT, NB-Turbo, ND-2L

speed
Speed Racer
Posts: 3471
Joined: Sun Jan 19, 2014 9:52 am
Vehicle: NA6
Location: Lugarno, Sydney

Re: BEAVIS' White Track Car

Postby speed » Thu Nov 02, 2017 12:19 pm

That heat shield is sexy!

Sent from my SM-A520F using Tapatalk
NA6 turbo - 140kw atw - not the most powerful but so much fun :D

User avatar
beavis
Forum sponsor
Posts: 1405
Joined: Mon Feb 02, 2009 12:31 pm
Vehicle: NB8B - Turbo
Location: Melbourne

Re: BEAVIS' White Track Car

Postby beavis » Sat Nov 04, 2017 5:59 pm

Now if you've been following my posts via Instagram/Facebook you'll have seen I recently got this Electric water pump in and working.
Why go electric water pump? Other than the personal challenge and my own curiosity in something different, it will allow for running the pump even when the motor has stopped, which will presumably be good for the turbo, it makes bleeding a breeze as theres no thermostat and therefore no need to run the motor up to temp to try flush out air pockets and it is controllable via the ECU.
Image

To get the thing in and working, I first needed to remove the old mechanical belt dríven water pump (which was brand new sadly so theres $100 down the drain - doh!) and to get to the water pump, meant all the 'bits' on the front of the motor need to come off including valve cover and plastic timing belt covers, pulleys and the timing belt then lastly the water pump itself.
Image
Image

In place of the old water pump I've installed a modified & gutted spare water pump. This pump has had a block off plate welded where the old impeller lived, and is needed to do 3 important things... 1) fill the big hole in the front of the motor, 2) Provide mounting locations for the timing belt pulleys, 3) provides the convenient location on the exhaust side of the motor where the water pump inlet housing bolts to...
You can also see the slightly odd nakedness of having no water pump pulley. All I need now is a belt from the crank to the alternator. No other belt dríven items on this motor anymore.
Image

Speaking of the inlet housing, that also copped some modification. I flipped it 180 degrees, shortened it, and blocked off the old holes for the heater core hard line and the small coolant line barb.
Image

With all that done, the new Electric Water Pump had a home to go to, and it fit right in. The pumps inlet and outlet are about 38mm diameter, wheres the Mazda runs 32mm hoses. So I found some aeropro branded straight reducers locally which fit perfectly on each end, and made the install a breeze. (now that everything else was modified to suit)
Image

The elec pump is now all plumbed into the radiator, and the inlet to the 'dummy water pump'. It sits in place just with the support of the silicone hoses, no brackets or other mounting is required.
Image
Image

And, it's high enough above the bottom of the subframe that it shouldnt have any issues clearing the lower splitter and floor... And most importantly, the thing is pumping fluid! I ghetto rigged up a car battery to check it was all happy and it ran like a dream. Made some really amusing gulping noises for a minute or two before all the air was purged.
Image

Keep a look out as I've got a video coming in a week or two with more detail on the EWP if you are keen to see how it was done and want to hear my soothing voice talk you through the process. :P

Cheers
Turbo NB Build Thread | BeavisMotorsport.com | YouTube.com/bbeavis | Cars: NA6, NA8-VVT, NB-Turbo, ND-2L

User avatar
beavis
Forum sponsor
Posts: 1405
Joined: Mon Feb 02, 2009 12:31 pm
Vehicle: NB8B - Turbo
Location: Melbourne

Re: BEAVIS' White Track Car

Postby beavis » Sat Nov 25, 2017 5:04 am

To finish of the water pump from last time, there was one thing missing, the wiring and ECU control.
So while the pump WAS working, it was pumping coolant, but it was just some temporary wiring.
As such, let me introduce you to the Bartine Engineering mosfet control board do-hickey which is triggered by the MS3 ECU to allow PWM control of the pump.
With this (and the help Alex's wiring skils) the pump is now ramped up dependant on coolant temperature so that it can function like a thermostat.
It seems to work well however time will tell once the car is up to speed and we can log coolant temps to see how they stabilse.
Image

Also from a temperature perspective, I've wrapped my intake in this ebay spec gold tape. The stuff gives off a nice glow so I'm hoping it will help reflect radiant heat and aid in keeping intake air temperatures down.
I may also wrap the intake tube from the intercooler to the trottle body... perhaps I will see how this goes first. I'm assuming it will be able to hold up to the on track demands.
Image
Image

I've hit an important milestore, it's finally time to start thinking about finishing off the next phase of body/aero on the car. This is exciting because this is kind of all that's left before we take the car out for a real drive. (of course, the car is never 'done' but you get the idea...)
So a few items have started happening. Firstly, I've been considering redoing the front guards/fenders and cutting them in half, something like the shape shown with the blue tape line.
Image
Image

Secondly, is the new Lightyear wing that is going on the car. This is going to require a little bit of home engineering to get it mounted and fit up, and will need some endplates as the old ones appear to have been donated somewhere for the greater good. How do you lose wing endplates?
Image

Mocked up on the car just for a bit of fun, however it needs a lot of attention before it will be mounted up for the final time. New mounts, some cleaning up of the surface finish, and maybe a gurney flap?
Image

So.... she's getting closer to being back in action now.
For the moment, we are going away for a short trip overseas to visit family and take a little time off. As soon as I'm back I have no doubt I will be straight back to it. :D
Turbo NB Build Thread | BeavisMotorsport.com | YouTube.com/bbeavis | Cars: NA6, NA8-VVT, NB-Turbo, ND-2L

Tim_cyc03
Fast Driver
Posts: 160
Joined: Tue Apr 09, 2013 8:01 pm
Vehicle: NA8

Re: BEAVIS' White Track Car

Postby Tim_cyc03 » Sat Nov 25, 2017 6:10 pm

I like the current way that you have the fenders. I'm assuming that you will be running side skirts, and from my visualization fluid dynamics, VFD (similar to CFD however made up of black magic theories and absolutely no scientific data) I reckon it would work possibly better with the side skirts. Sort of similar to an R8 GT3.

Cutting (obviously similar to Hypermiata/Creampuff/Morpheus) reminds me of the 1990 Rx7 IMSA GTO style. I have no idea which is better, but I would be keen to try something similar to your current style, and also note any differences. (however I won't and mine will stay as is)

User avatar
beavis
Forum sponsor
Posts: 1405
Joined: Mon Feb 02, 2009 12:31 pm
Vehicle: NB8B - Turbo
Location: Melbourne

Re: BEAVIS' White Track Car

Postby beavis » Tue Nov 28, 2017 12:50 pm

Tim_cyc03 wrote:I like the current way that you have the fenders. I'm assuming that you will be running side skirts, and from my visualization fluid dynamics, VFD (similar to CFD however made up of black magic theories and absolutely no scientific data) I reckon it would work possibly better with the side skirts. Sort of similar to an R8 GT3.

Cutting (obviously similar to Hypermiata/Creampuff/Morpheus) reminds me of the 1990 Rx7 IMSA GTO style. I have no idea which is better, but I would be keen to try something similar to your current style, and also note any differences. (however I won't and mine will stay as is)


The side skirts were not installed in the pics above, but yes there are supposed to be some.
The alternative I'm considering is adding vents at the top LMS car style:

Image

This however, won't net me any weight savings, whereas cutting away some of the guard will..... so I'm not sure. Perhaps I should do both??
Turbo NB Build Thread | BeavisMotorsport.com | YouTube.com/bbeavis | Cars: NA6, NA8-VVT, NB-Turbo, ND-2L

User avatar
beavis
Forum sponsor
Posts: 1405
Joined: Mon Feb 02, 2009 12:31 pm
Vehicle: NB8B - Turbo
Location: Melbourne

Re: BEAVIS' White Track Car

Postby beavis » Wed Mar 28, 2018 12:03 am

So long time no post... this is going to be a little lengthy, so bear with me.
To continue the talk on the Lightyear wing element from the last post, lets start with the mount.

While originally I was just going to bolt it directly onto the old aluminium mounts, somehow along the way I convinced myself it was a good idea to invest the time into mounting the thing 'swan-neck' style.
This specific wing was a prototype and wasn't manufactured with these top mounts in mind, so to make it strong enough to support the forces it will be facing, I re-purposed the underside mounts into spreader plates, glued them in place and temporarily screwed them down.
Image

Then drilled through the screw holes to run bolts to the top side which attach to the top mounts.
Image

New upper 6mm plates in the 'swan neck' shape were made to attach the thing to the existing (although slightly modified) uprights.
Image

Made some carbon end plates with a foam core, about 8mm thick so they are pretty beefy, but at least we won't see any inward bending on the underside when at speed.
Image

Still needs some cleaning up and refinement but the bulk of the work on the wing is now complete. It's just about as wide as the body of the car, around 1660mm or so.
Image

I did a quick front guard/fender hack job, should theoretically make for better wheel well airflow. I literally just marked out a line, and had at it with the angle grinder. Nothing particularly fancy here. You can just see a section of aluminium under the lowest point of the guard to hold it securely and avoid any movement when at speed.
Image

With the wing now mounted and front guards cut, the car was starting to look pretty aggressive again.
Image

And then it was time to fix the front end. The first step was to work on a new splitter, I wanted to try build something that would be easily removed to make loading on the trailer easier, and ideally nice and wide.
I started with a sheet of this aluminum composite panel stuff. It's nifty but perhaps a little too weak for a splitter. I can only find it in 6mm sheets here in Melbourne, anything stronger or thicker is a lot more costly and harder to source.
Image

Doing this sort of work results in a garage that's a complete mess....
Image

Anyway, with some persistence, I got the front end done. I also blocked the OEM fog light holes with some sheet aluminium, and the gap between the bumper and splitter is just filled with plastic garden edging. (it's a little too heavy but such is life.)
Image
Image

Then believe it or not, my worst fears were to become reality, the splitter composite panel just wasn't strong enough for the span it covered without additional support. How did I find this out?
Image

Well I took the car for a sneaky little test out to Phillip Island to iron out some bugs and see what needed fixing/refining etc. Clearly, the splitter was one of those things.
Image

Despite the splitter needing to be trimmed down to stop it failing, the car worked! Well, mostly. There's a small list of issues that I need to work through but the thing is getting back out there on the tarmac.

Image
Image
Image

Some of the said issues included:
  • Missing a front swaybar endlink (no front sway made for a bad experience)
  • Loose exhaust clamp.
  • No oil pressure sensor to ECU.
  • No speed sensor to ECU.
  • ABS doesn't seem to be working. (this is a worry)

On the upside, I've got most of those fixed now (except the ABS, that's still a concerning once), and finally starting to drive the car again which had been sitting (although, not being left untouched) for nearly 3 years.
And, I have entered the next MX-5 VIC club sprint day at Winton in about 3 weeks which will be a blast I'm sure!
Turbo NB Build Thread | BeavisMotorsport.com | YouTube.com/bbeavis | Cars: NA6, NA8-VVT, NB-Turbo, ND-2L

User avatar
SKYHI
Racing Driver
Posts: 1355
Joined: Sun Apr 01, 2007 8:08 am
Vehicle: NB SE
Location: Brisbane

Re: BEAVIS' White Track Car

Postby SKYHI » Thu Mar 29, 2018 3:46 pm

Good to see the car back on track Beavis. I'm getting inspired again after leaving my car untouched for a while and hoping to get out to a test day in the next couple of months before joining in on some the Time Attack rounds here in QLD later in the year.

Do you have anyway to test the aero changes you make or is it all come down to the stopwatch?

User avatar
beavis
Forum sponsor
Posts: 1405
Joined: Mon Feb 02, 2009 12:31 pm
Vehicle: NB8B - Turbo
Location: Melbourne

Re: BEAVIS' White Track Car

Postby beavis » Thu Mar 29, 2018 4:24 pm

Nothing fancy TCR, just rely on laptimes and driver feel to know whats working and what isn't.
Turbo NB Build Thread | BeavisMotorsport.com | YouTube.com/bbeavis | Cars: NA6, NA8-VVT, NB-Turbo, ND-2L

RS2000
Racing Driver
Posts: 680
Joined: Mon Nov 25, 2013 7:38 am
Vehicle: NB8A
Location: Newcastle

Re: BEAVIS' White Track Car

Postby RS2000 » Thu Mar 29, 2018 5:21 pm

I like the modular timber blocks to get the car up on it's wheels. Interlocking I presume.

User avatar
NitroDann
Forum sponsor
Posts: 10280
Joined: Thu Nov 05, 2009 12:10 pm
Vehicle: NA6
Location: Newcastle NSW
Contact:

Re: BEAVIS' White Track Car

Postby NitroDann » Thu Mar 29, 2018 6:03 pm

Car looks great Brendan.

Dann
http://www.NitroDann.com

speed wrote:If I was to do it again, I wouldn't even consider the supercharger.

User avatar
beavis
Forum sponsor
Posts: 1405
Joined: Mon Feb 02, 2009 12:31 pm
Vehicle: NB8B - Turbo
Location: Melbourne

Re: BEAVIS' White Track Car

Postby beavis » Thu Apr 12, 2018 10:42 pm

Welp, although I had submitted entry about a month ago, sadly I've been informed I cannot attend the MX-5 VIC versus NSW event this weekend as it's over booked and my entry has been denied.

Would've been great to have gotten the car out there with all the other MX-5 folk, including those from interstate.... So be it.

:frown:
Turbo NB Build Thread | BeavisMotorsport.com | YouTube.com/bbeavis | Cars: NA6, NA8-VVT, NB-Turbo, ND-2L

User avatar
Daffy
Forum legend
Posts: 1366
Joined: Tue Apr 28, 2015 3:23 pm
Vehicle: NB SE
Location: Southern Gold Coast QLD

Re: BEAVIS' White Track Car

Postby Daffy » Thu Apr 12, 2018 11:09 pm

Rotten luck mate-
Any thoughts of running some track time in QLD?
StanTheMan wrote:sweet, Its not all about huge hp.

viewtopic.php?t=73496


Return to “MX5 Garage Chat”

Who is online

Users browsing this forum: No registered users and 26 guests