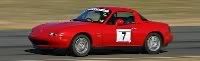
195? 205 for tyres?
either way... looks great!
Hammer's Clubbie
Moderators: timk, Stu, -alex, miata, StanTheMan, greenMachine, ManiacLachy, Daffy, zombie, Andrew, The American, Lokiel
-
PUR157

- Racing Driver
- Posts: 967
- Joined: Sun Sep 17, 2006 5:26 pm
- Vehicle: Clubman
- Location: Sydney, Capital of Australia
- Contact:
Hammer's Clubbie - 05 July 09 Update
Oneness of Man and Machine

-
Hammer

- Speed Racer
- Posts: 2849
- Joined: Fri Apr 25, 2003 11:00 am
- Vehicle: NB SP
- Location: Sydney
- Contact:
Hammer's Clubbie - 05 July 09 Update
PUR157 wrote:195? 205 for tyres?
either way... looks great!
205s. Though 195 would have been better with the 50 aspect ratio IMO.
H@mmer - 1994 Clubman | 2002 SP
GO TOPLESS!!!
GO TOPLESS!!!
-
Hammer
- Speed Racer
- Posts: 2849
- Joined: Fri Apr 25, 2003 11:00 am
- Vehicle: NB SP
- Location: Sydney
- Contact:
Hammer's Clubbie - 12 July 09 Update
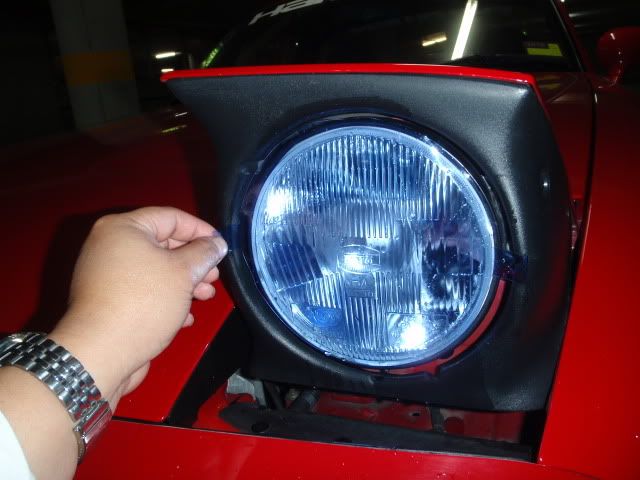
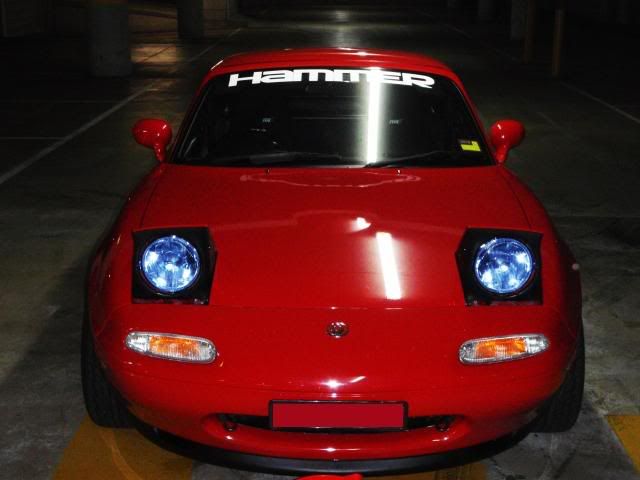
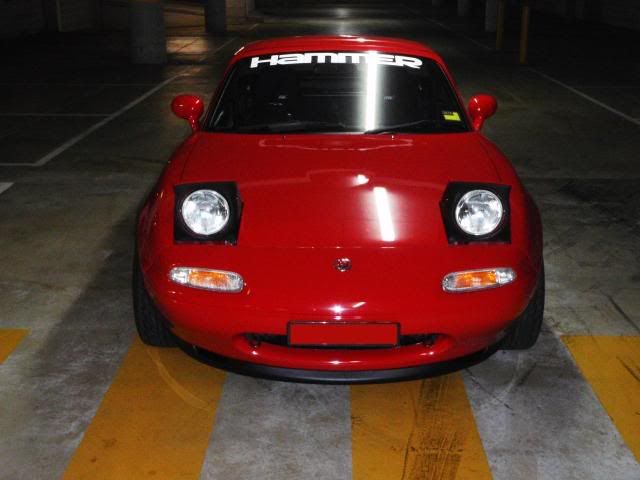
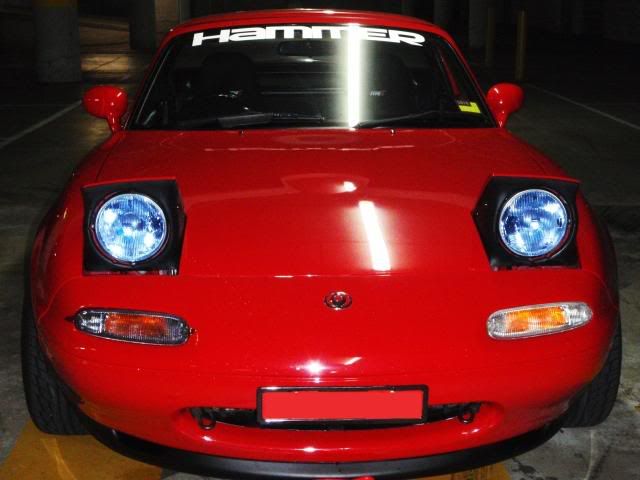
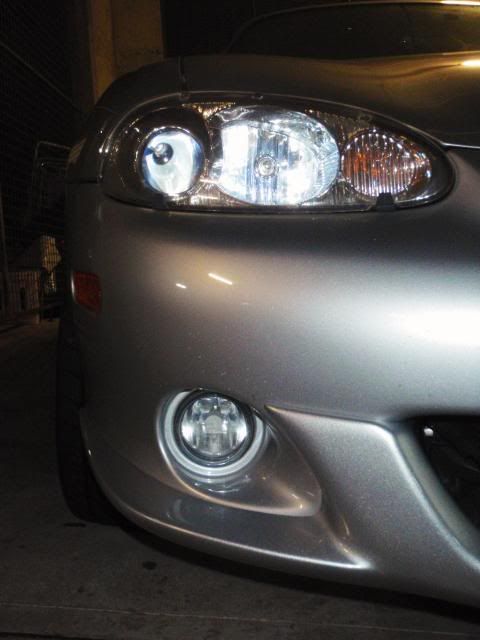
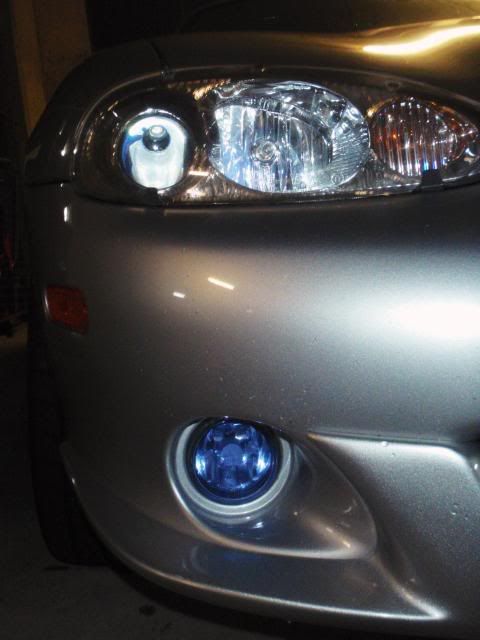
I got these from the US the other week.
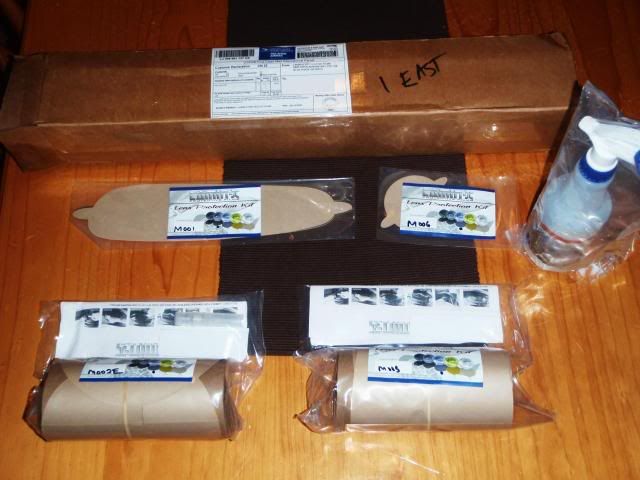
In case you haven't figured it out yet, these are protective films/laminates. I bought some pre-cut versions for the blinkers (in tint colour) and for the headlights (Optic Blue). The main reason I got these is for protection (aka headlight protectors etc). The bling factor was an after effect.
The film are very high in quality and very forgiving. Warming the film is recommended. Makes the film softer and easier to handle especially when aligning at fitting.

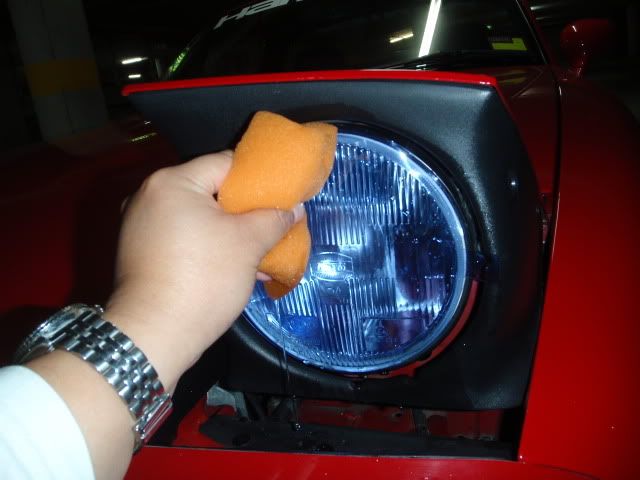
After thoroughly cleaning the headlight, spray (1 or 2) light mist on the headlight to help with the alignment (though if I have to do it again, I won't bother with spraying the surface). The film is very forgiving and have lots of give.
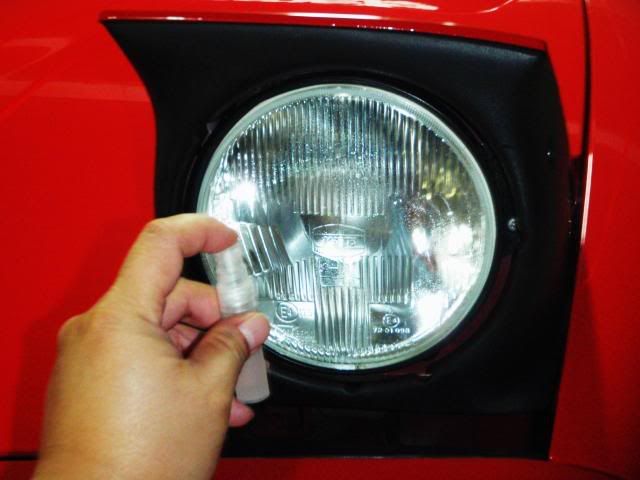
Moisten the surface of the film to provide some lubrication when using the plactic card applicator to squeeze bubbles and/or water
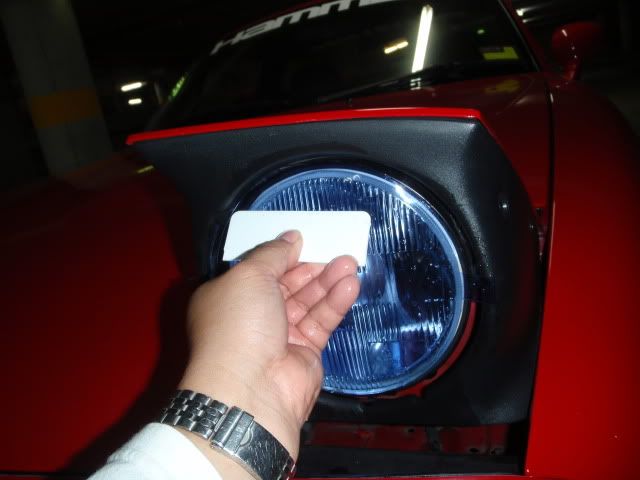
The pre-cut film is bigger than the headlight, so trimming is necessary.

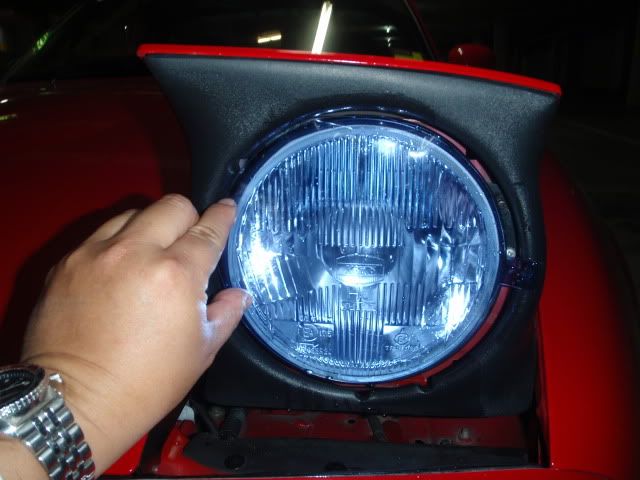
Comparison of one with and one without
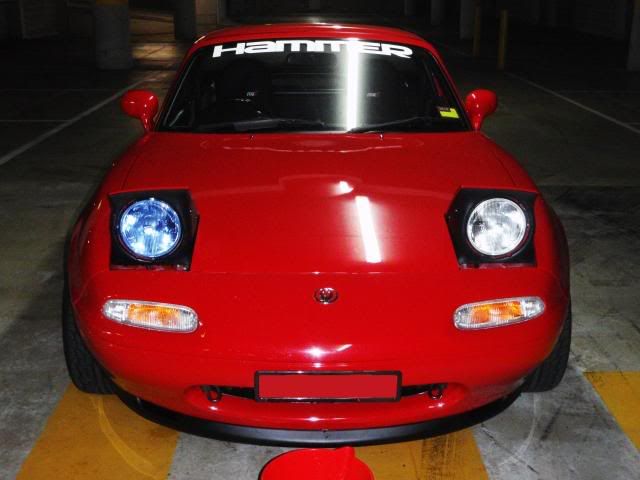
Headlights completed. Now on to the blinkers.
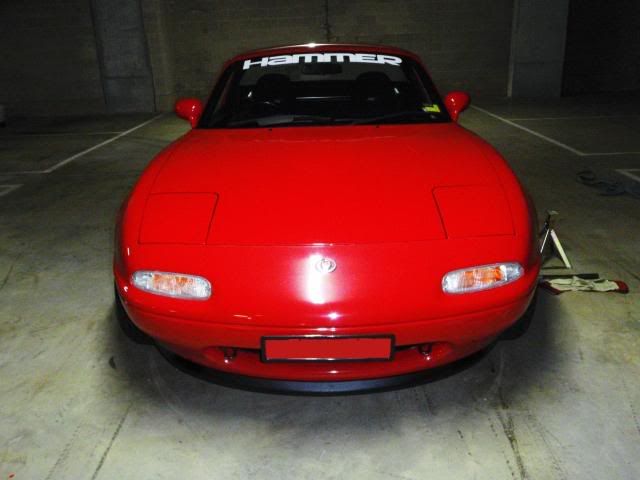
Before
In case you haven't figured it out yet, these are protective films/laminates. I bought some pre-cut versions for the blinkers (in tint colour) and for the headlights (Optic Blue). The main reason I got these is for protection (aka headlight protectors etc). The bling factor was an after effect.
The film are very high in quality and very forgiving. Warming the film is recommended. Makes the film softer and easier to handle especially when aligning at fitting.
After thoroughly cleaning the headlight, spray (1 or 2) light mist on the headlight to help with the alignment (though if I have to do it again, I won't bother with spraying the surface). The film is very forgiving and have lots of give.
Moisten the surface of the film to provide some lubrication when using the plactic card applicator to squeeze bubbles and/or water
The pre-cut film is bigger than the headlight, so trimming is necessary.
Comparison of one with and one without
Headlights completed. Now on to the blinkers.
Before
H@mmer - 1994 Clubman | 2002 SP
GO TOPLESS!!!
GO TOPLESS!!!
-
Hammer
- Speed Racer
- Posts: 2849
- Joined: Fri Apr 25, 2003 11:00 am
- Vehicle: NB SP
- Location: Sydney
- Contact:
Hammer's Clubbie - 12 July 09 Update
Now it’s time for the blinkers. I choose the colour “tint” - Not the darkest in their range. I just wanted to have a slight smoke look and still need the parkers and blinkers very visible at daylight.
The usual steps taken (1. Clean surface thoroughly; 2. Warm film with a hair dryer; 3. Slight spay of mist on the blinker surface)....
...the film was applied
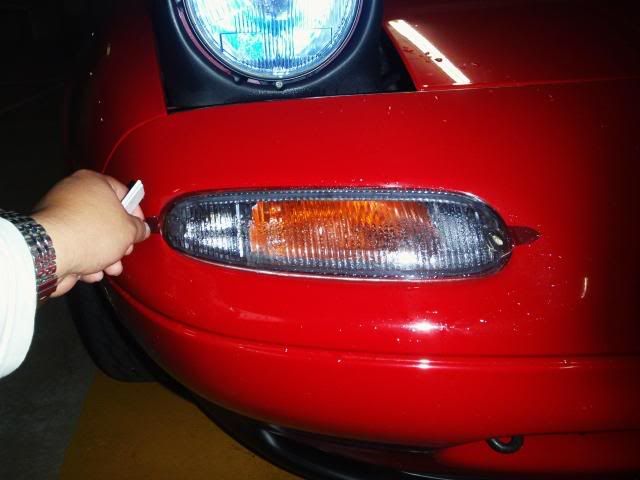
Wet surface of film before using the plastic applicator to squeeze out bubbles and water in between.

Trimming excess film is easily done with a very sharp blade
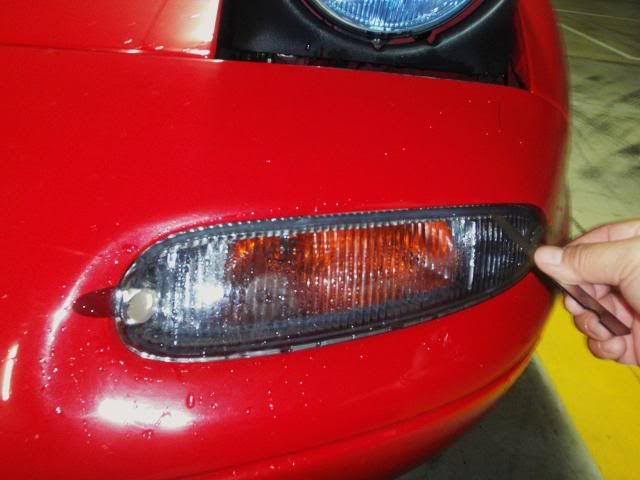
Comparison between one with a film and one without
Finished
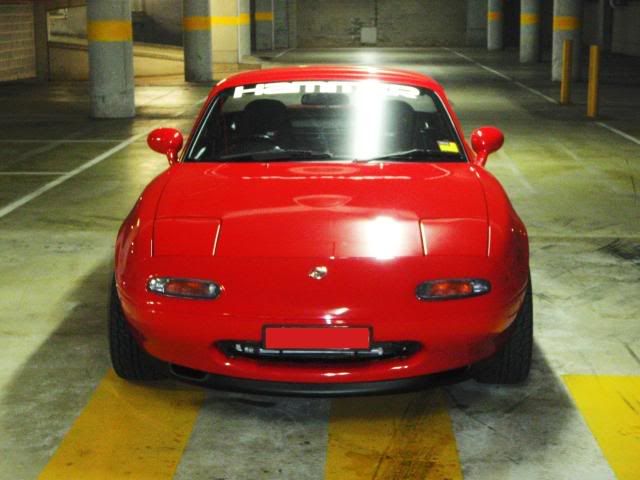
Before
Before and after shots

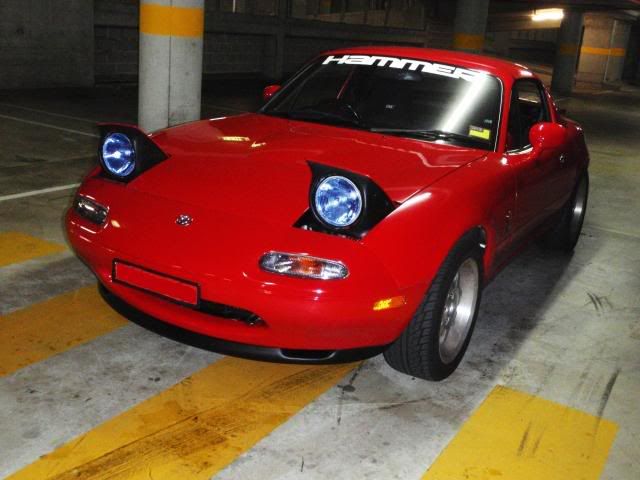
Looking at these photos, it does not look like they are much different, but in person (& daylight), they are much darker and more blue. The flash made them look lighter.
The usual steps taken (1. Clean surface thoroughly; 2. Warm film with a hair dryer; 3. Slight spay of mist on the blinker surface)....
...the film was applied
Wet surface of film before using the plastic applicator to squeeze out bubbles and water in between.
Trimming excess film is easily done with a very sharp blade
Comparison between one with a film and one without
Finished
Before
Before and after shots
Looking at these photos, it does not look like they are much different, but in person (& daylight), they are much darker and more blue. The flash made them look lighter.
H@mmer - 1994 Clubman | 2002 SP
GO TOPLESS!!!
GO TOPLESS!!!
-
Hammer
- Speed Racer
- Posts: 2849
- Joined: Fri Apr 25, 2003 11:00 am
- Vehicle: NB SP
- Location: Sydney
- Contact:
Hammer's Clubbie - 12 July 09 Update
I also did the fog lights of my SP (no need for the headlight as they have factory headlight protectors).
Before & After
Before

After
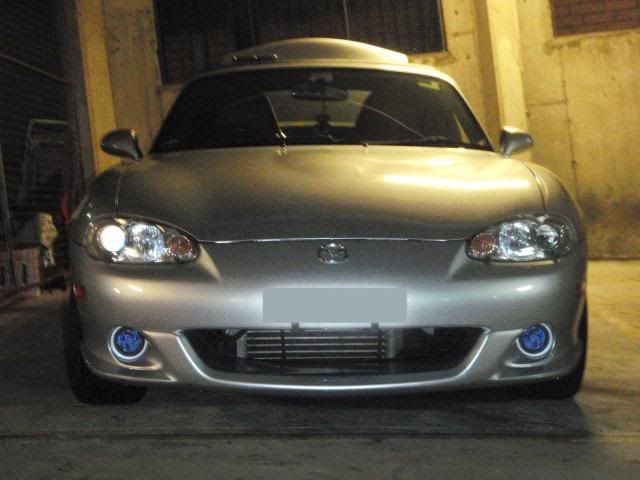
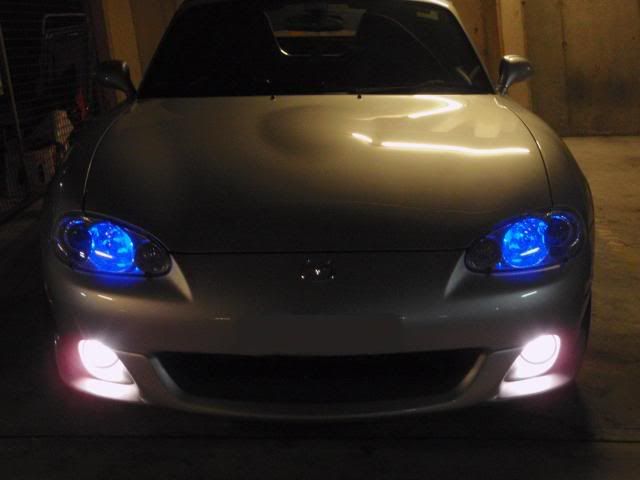
Before & After
Before
After
H@mmer - 1994 Clubman | 2002 SP
GO TOPLESS!!!
GO TOPLESS!!!
-
RG.net
- Racing Driver
- Posts: 1692
- Joined: Thu Apr 06, 2006 7:48 pm
- Vehicle: NA6
- Location: Sydney
- Contact:
Hammer's Clubbie - 12 July 09 Update
looks good!
i've been wanting to get some blue film for my headlights for a while, i wonder if there are any local suppliers.
i've been wanting to get some blue film for my headlights for a while, i wonder if there are any local suppliers.
http://Run-It-Hard.com - We're here to have fun!
-
Jeo

- Speed Racer
- Posts: 3658
- Joined: Thu Jun 26, 2008 9:33 am
- Vehicle: NB8B
- Location: Canberra
Hammer's Clubbie - 12 July 09 Update
That looks really nice Hammer.
-
CoffeeBoss

- suntory
- Posts: 1081
- Joined: Sun Aug 01, 2004 10:58 pm
- Vehicle: NC
- Location: Sydney / Sth Highlands
- Contact:
Hammer's Clubbie - 12 July 09 Update
So does this - good work Alan 
(pic stolen from OzMazda thread)

(pic stolen from OzMazda thread)
-
f3lix
- Learner Driver
- Posts: 12
- Joined: Sat Apr 25, 2009 1:31 am
- Vehicle: NA6
- Location: Wollongong
Hammer's Clubbie - 12 July 09 Update
is that what they use!?
i always thought they were aftermarket blinkers and headlights
looks awesome
i always thought they were aftermarket blinkers and headlights
looks awesome
-
Hammer
- Speed Racer
- Posts: 2849
- Joined: Fri Apr 25, 2003 11:00 am
- Vehicle: NB SP
- Location: Sydney
- Contact:
Hammer's Clubbie - 12 July 09 Update
CoffeeBoss wrote:So does this - good work Alan
Thanks sharing the pix Matt. Haven't had a chance to check them out yet.
f3lix wrote:is that what they use!?
i always thought they were aftermarket blinkers and headlights
looks awesome
f3lix, there are two types of smoked lights, there are the smoked type (replacement units), then there are the cheaper alternative like what I did - smoked laminate.
H@mmer - 1994 Clubman | 2002 SP
GO TOPLESS!!!
GO TOPLESS!!!
-
d-mag

- Road Track Rally
- Posts: 529
- Joined: Fri Jun 27, 2008 9:34 am
- Vehicle: ND - Turbo
- Location: Melbourne
Hammer's Clubbie - 12 July 09 Update
Car looks stunning in person Alan. It's a credit to you.
Kijima and I stood in the scrutineering bay at Wakefield just drooling.
Good to see you again mate.
Kijima and I stood in the scrutineering bay at Wakefield just drooling.
Good to see you again mate.
MX5 Wanted. SE or NC (forced induction preferred  )
)
-
Hammer
- Speed Racer
- Posts: 2849
- Joined: Fri Apr 25, 2003 11:00 am
- Vehicle: NB SP
- Location: Sydney
- Contact:
Hammer's Clubbie - 14 March 2010 Update
Finally got some time to do a quick update on my Clubbie thread.
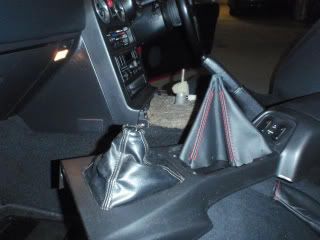
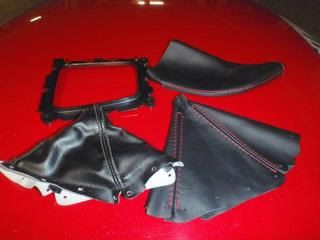
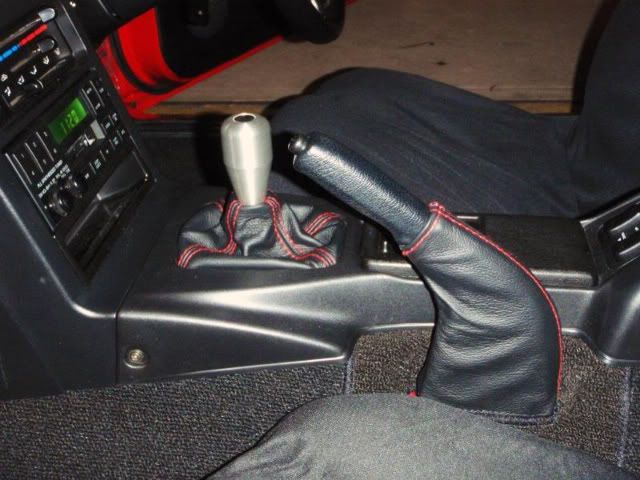
About 12 months ago, I replaced the OEM vinyls with these genuine leather boots combo. Not bad for under $40 delivered (from the UK) through eBay.
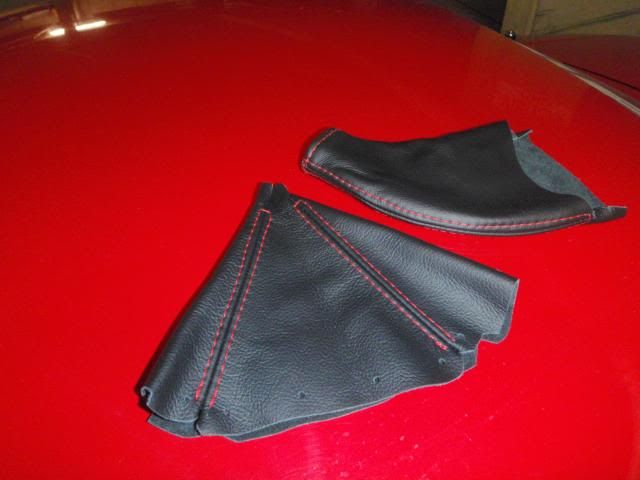
The silver gear knob is a spare OEM SP gear knob I have. Though I found out they're not so good during track days if not wearing gloves. My left palm started to get irritated at the end of the day.

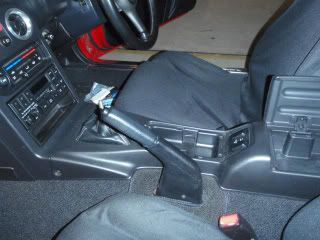
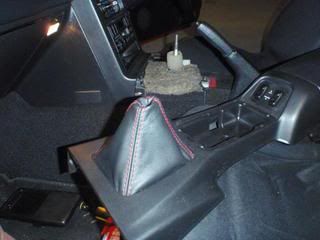

BEFORE
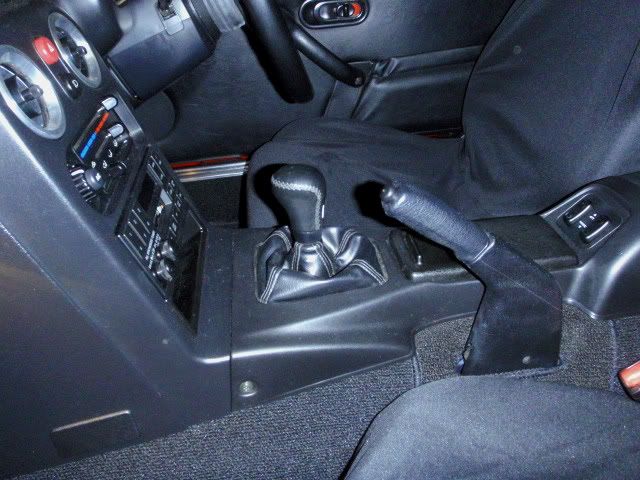
AFTER
About 12 months ago, I replaced the OEM vinyls with these genuine leather boots combo. Not bad for under $40 delivered (from the UK) through eBay.
The silver gear knob is a spare OEM SP gear knob I have. Though I found out they're not so good during track days if not wearing gloves. My left palm started to get irritated at the end of the day.
BEFORE
AFTER
H@mmer - 1994 Clubman | 2002 SP
GO TOPLESS!!!
GO TOPLESS!!!
-
Hammer
- Speed Racer
- Posts: 2849
- Joined: Fri Apr 25, 2003 11:00 am
- Vehicle: NB SP
- Location: Sydney
- Contact:
Hammer's Clubbie - 14 March 2010 Update
MX-5 Club of NSW Dyno Day - 29 August 2009
76kw @ the rear wheels from a stock standard NA8 Ohhh I wish it had double that.
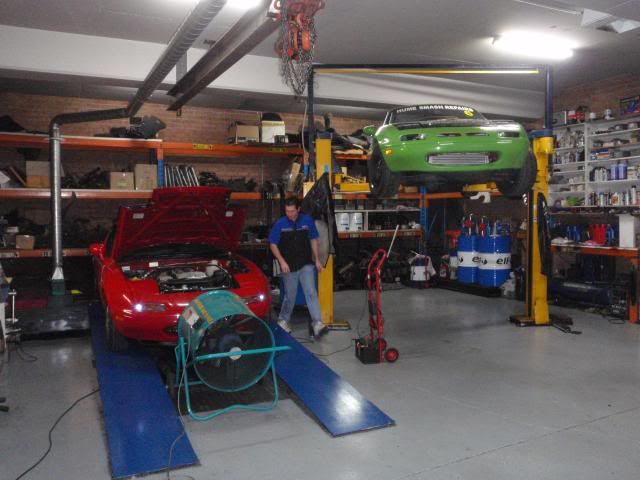
76kw @ the rear wheels from a stock standard NA8
H@mmer - 1994 Clubman | 2002 SP
GO TOPLESS!!!
GO TOPLESS!!!
-
jules

- Guitar Hero
- Posts: 3562
- Joined: Thu Apr 24, 2003 11:00 am
- Vehicle: NA6
- Location: Sydney, previously HQ - GC Dodgy Inc.
- Contact:
Hammer's Clubbie - 14 March 2010 Update
Haha. I recognise that little green monster. It spent a few days sleeping at my place!
Jules
Jules
Founder of the Gold Coast Chapter of the Honourable Brothers of Dodgy.

-
Hammer
- Speed Racer
- Posts: 2849
- Joined: Fri Apr 25, 2003 11:00 am
- Vehicle: NB SP
- Location: Sydney
- Contact:
Hammer's Clubbie - 14 March 2010 Update
16 APRIL 2010
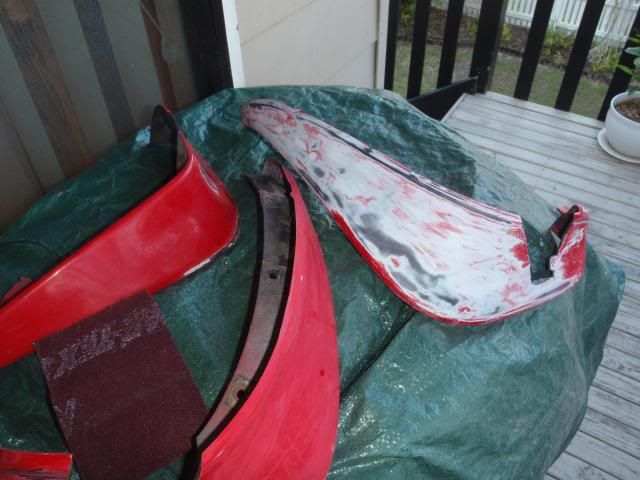
I've managed to start work on the 2nd hand mudflaps set that I got from eBay some 6 months ago.
My original mudflaps needed to be removed to fit the OEM style rear bumper lip spoiler. However, after checking the fitment further...I realised they can be fitted back with slight modification to the mudflaps. Meaning cutting bits and pieces off them.
I didn't want to butcher my original mudflaps (they're in excellend condition), so I got these 2nd hand items instead. The set also came with the front pair which I didn't have in my car. Sweet. And its even sweeter the rear set are the NA8 type - just like my original.
They came painted in Classic Red but in need of a good refresher. They were faded all over and badly scratched in certain areas.
First step was to make the cuts. I took my time on this as I didn't want to make a mistake. I was lucky the measurements were close enough. And since these parts will be under the guard and bumper, slight over-cuts will not show.
The second step was to tackle them with lots of elbow grease and varying grades of wet & dry sandpaper.

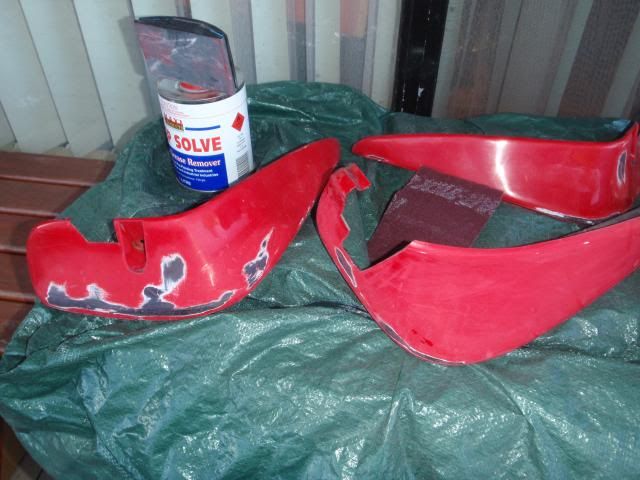
When I was happy with the finish, I wiped them clean with a prep solvent, and taped off areas that I wanted to remain black. I followed this by a quick wipe with the prep solvent once more to ensure all the grease, glue or grime have been removed from the surface.
Plastic primer (in presure pack can) was then applied. I only applied one coat. Though I think I should have applied two. When this had dried, a once over with 1200 grit wet & dry, followed by the prep solvent.
I then made the first of four light coats of "Classic Red" paint which I got mixed into a pressure pack can.
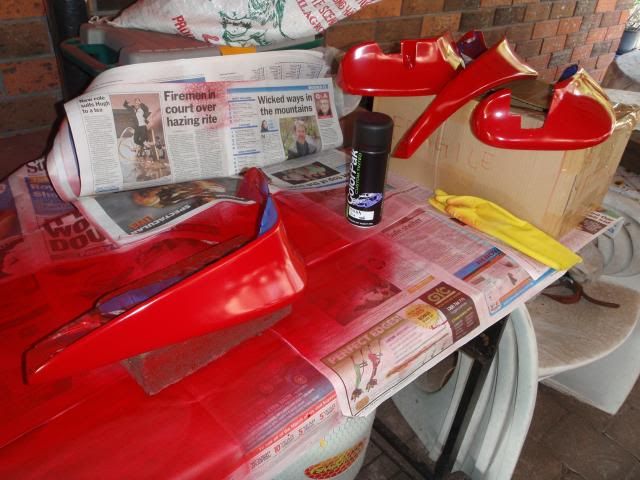
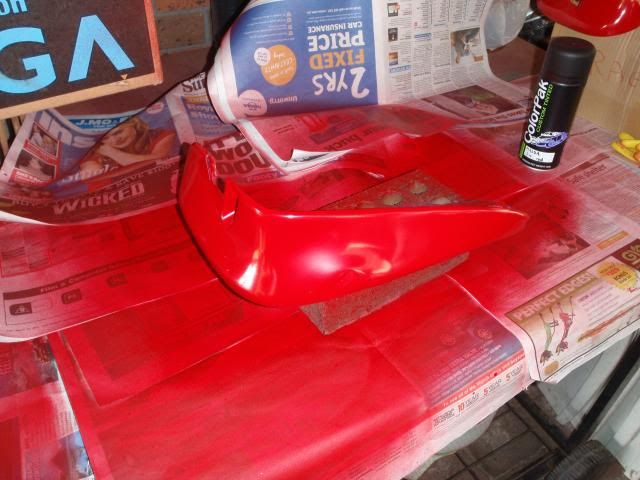
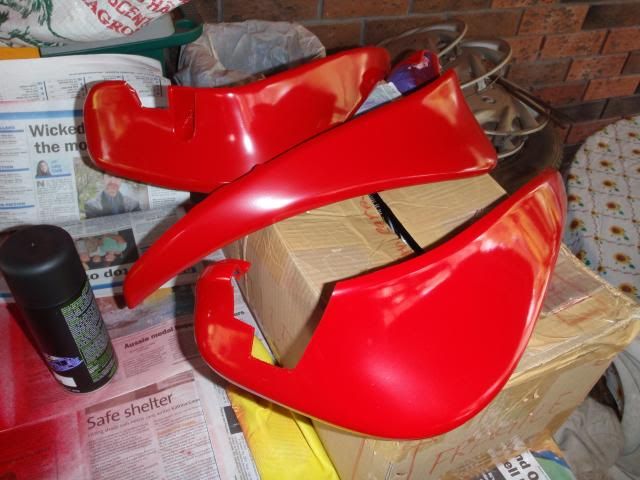
I ended up using 2x 500ml pressure pack cans to cover all four mudflaps with four coats each. The 2nd can feels like it still have about 1/3 left on it.
Now its all a waiting game. I have to wait 7 days for the paint to cure before I can do a light cut & polish, followed by wax.
I can't wait to fit them back into the car
I've managed to start work on the 2nd hand mudflaps set that I got from eBay some 6 months ago.
My original mudflaps needed to be removed to fit the OEM style rear bumper lip spoiler. However, after checking the fitment further...I realised they can be fitted back with slight modification to the mudflaps. Meaning cutting bits and pieces off them.
I didn't want to butcher my original mudflaps (they're in excellend condition), so I got these 2nd hand items instead. The set also came with the front pair which I didn't have in my car. Sweet. And its even sweeter the rear set are the NA8 type - just like my original.
They came painted in Classic Red but in need of a good refresher. They were faded all over and badly scratched in certain areas.
First step was to make the cuts. I took my time on this as I didn't want to make a mistake. I was lucky the measurements were close enough. And since these parts will be under the guard and bumper, slight over-cuts will not show.
The second step was to tackle them with lots of elbow grease and varying grades of wet & dry sandpaper.
When I was happy with the finish, I wiped them clean with a prep solvent, and taped off areas that I wanted to remain black. I followed this by a quick wipe with the prep solvent once more to ensure all the grease, glue or grime have been removed from the surface.
Plastic primer (in presure pack can) was then applied. I only applied one coat. Though I think I should have applied two. When this had dried, a once over with 1200 grit wet & dry, followed by the prep solvent.
I then made the first of four light coats of "Classic Red" paint which I got mixed into a pressure pack can.
I ended up using 2x 500ml pressure pack cans to cover all four mudflaps with four coats each. The 2nd can feels like it still have about 1/3 left on it.
Now its all a waiting game. I have to wait 7 days for the paint to cure before I can do a light cut & polish, followed by wax.
I can't wait to fit them back into the car
H@mmer - 1994 Clubman | 2002 SP
GO TOPLESS!!!
GO TOPLESS!!!
Who is online
Users browsing this forum: No registered users and 20 guests


