The pedal box will not, at least in QLD be road legal. Further it will bump you up in classes!
I would love this as the balance bar controls the bias not a valve!
Still interested in the booster delete block. However if numbers needed for the pedal box I will possibly join in.
Brake booster delete - mounting plate
Moderators: timk, Stu, -alex, miata, zombie, Andrew
-
Magpie
- Speed Racer
- Posts: 7468
- Joined: Fri Feb 11, 2011 12:49 pm
- Vehicle: NA6
- Location: Purga, QLD
-
madjak
- Racing Driver
- Posts: 1117
- Joined: Tue Dec 31, 2013 12:11 pm
- Vehicle: NA6
Re: Brake booster delete - mounting plate
I can make up both... I don't think the brake mods would effect CAMS 2B, just 2F.
It's not really a pedal box unless I have to modify the pedal supports massively. It should all work with the existing brake lever and mounting box, just no booster and a plate instead.
It's not really a pedal box unless I have to modify the pedal supports massively. It should all work with the existing brake lever and mounting box, just no booster and a plate instead.
NA8: N/A 200whp | Haltech | Skunk2 Intake | S90 TB | RCP | 5 speed c/r dogbox | 4.78 diff | AST Shocks
Barbs L: 64.12 | S: 58.62 | Collie: 49.72
Barbs L: 64.12 | S: 58.62 | Collie: 49.72
-
madjak
- Racing Driver
- Posts: 1117
- Joined: Tue Dec 31, 2013 12:11 pm
- Vehicle: NA6
Re: Brake booster delete - mounting plate
ok... So the brake booster and the pedal box is out.
The dual masters is probably going to be easier than I had expected as I think as the centers for the master cylinders happen to line up with the existing mounts on the pedal box. This means I can bolt straight through from the master through the firewall and then through into the pedal box without even requiring a spacer bracket. The only issue with this approach is that parts of the pedal box will need to be removed to clear the master cylinder pin. I could offset it out but I much prefer this approach as it will be easy to brace the pedal box where material is removed, and it means the masters are directly fixed to the pedal box which will give added rigidity.
With the balance bar, I'm going to weld it directly into the pedal so that the pivot points remain unchanged. Once again a direct attachment is better than mounting with bolts as I think any movement in the brake linkages would reduce pedal feel. I'll also have to make up some longer pushrods to drive the masters as the existing ones are too short.
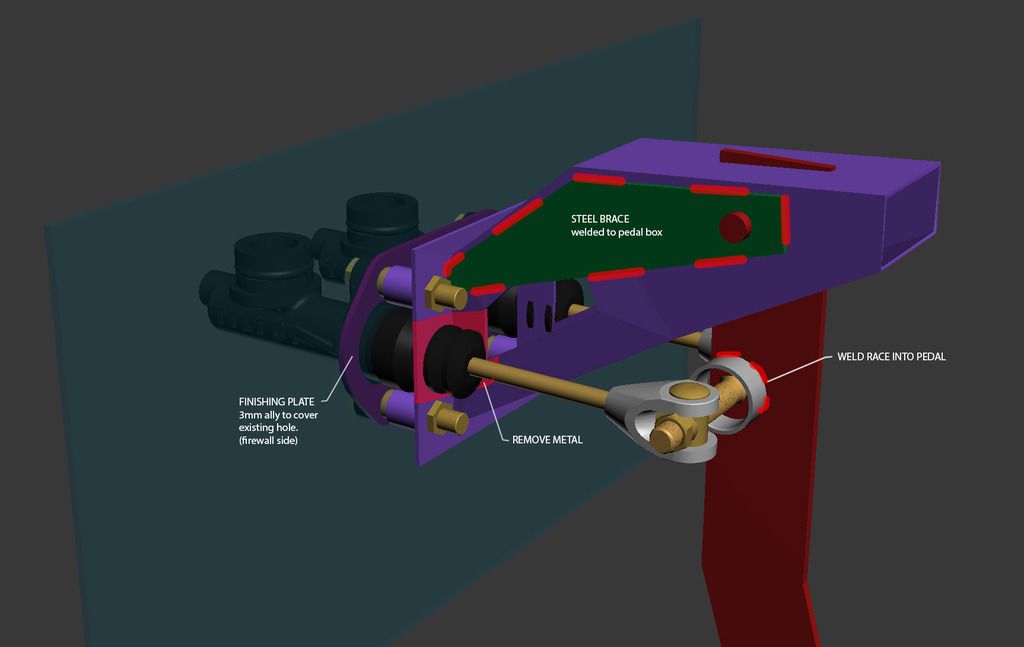
Note: the pedal box isn't to scale... representative only!
I've purchased a 5/8" (0.625") master for the front and a 0.7" master for the rear. I specifically undersized them a little as I'm not going to change the pedal ratio with this approach and the smaller size will give me some additional leverage, with the side effect of additional pedal travel.
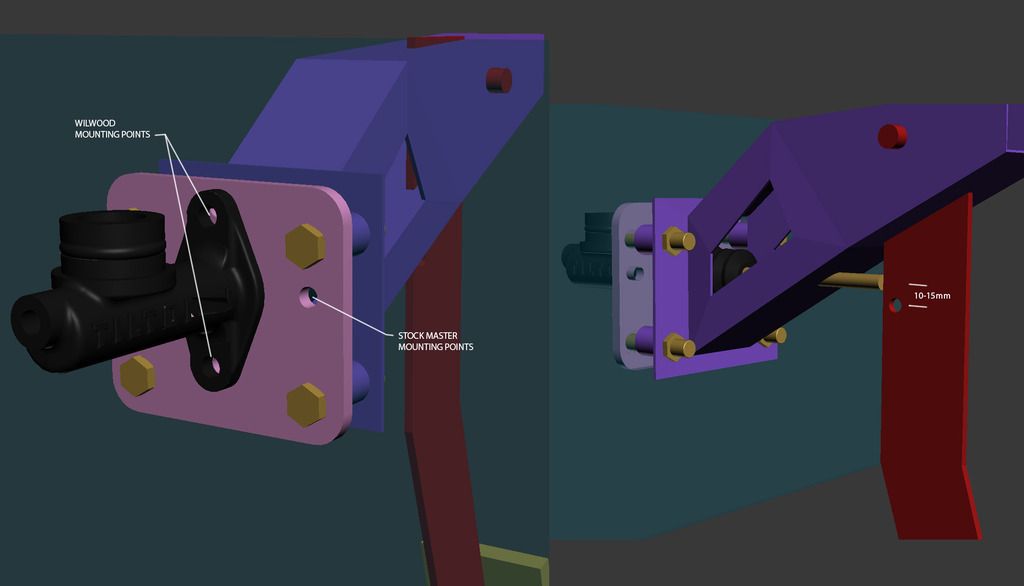
Right, now for anyone who wants to use their existing master then the pedal ratio is going to have to change. This means the master will have to move up a bit. I've designed a simple bracket that moves the master up 10mm, and allows for either the stock master or a dual Wilwood to be bolted through to the pedal box (picture shows a single master, but the mount points are the same). I'll get this bracket cut out of 8mm ally and mount it up and see how it works. A hole will need to be drilled in the pedal, but this could be positioned 10-15mm above the existing point so that the ratio can be increased more or less depending on your requirements.
The dual masters is probably going to be easier than I had expected as I think as the centers for the master cylinders happen to line up with the existing mounts on the pedal box. This means I can bolt straight through from the master through the firewall and then through into the pedal box without even requiring a spacer bracket. The only issue with this approach is that parts of the pedal box will need to be removed to clear the master cylinder pin. I could offset it out but I much prefer this approach as it will be easy to brace the pedal box where material is removed, and it means the masters are directly fixed to the pedal box which will give added rigidity.
With the balance bar, I'm going to weld it directly into the pedal so that the pivot points remain unchanged. Once again a direct attachment is better than mounting with bolts as I think any movement in the brake linkages would reduce pedal feel. I'll also have to make up some longer pushrods to drive the masters as the existing ones are too short.
Note: the pedal box isn't to scale... representative only!
I've purchased a 5/8" (0.625") master for the front and a 0.7" master for the rear. I specifically undersized them a little as I'm not going to change the pedal ratio with this approach and the smaller size will give me some additional leverage, with the side effect of additional pedal travel.
Right, now for anyone who wants to use their existing master then the pedal ratio is going to have to change. This means the master will have to move up a bit. I've designed a simple bracket that moves the master up 10mm, and allows for either the stock master or a dual Wilwood to be bolted through to the pedal box (picture shows a single master, but the mount points are the same). I'll get this bracket cut out of 8mm ally and mount it up and see how it works. A hole will need to be drilled in the pedal, but this could be positioned 10-15mm above the existing point so that the ratio can be increased more or less depending on your requirements.
NA8: N/A 200whp | Haltech | Skunk2 Intake | S90 TB | RCP | 5 speed c/r dogbox | 4.78 diff | AST Shocks
Barbs L: 64.12 | S: 58.62 | Collie: 49.72
Barbs L: 64.12 | S: 58.62 | Collie: 49.72
-
Magpie
- Speed Racer
- Posts: 7468
- Joined: Fri Feb 11, 2011 12:49 pm
- Vehicle: NA6
- Location: Purga, QLD
Re: Brake booster delete - mounting plate
I'm still interested!
NON ROAD REGISTERED
CAMS 2B/2F
9.1 MASTER CYLINDERS: Power boosters, master cylinders and associated pushrods, fluid lines and hoses are free. The position of replacement master cylinders is free and holes of the minimum necessary dimensions may be made in existing panels to facilitate such fitment. Brake proportioning valves are free. Anti lock brake systems may be removed or deactivated.
World Time Attack:
E.10 BRAKES With the exception of computer controlled diagonal or transverse braking systems, which are not permitted in any class unless originally fitted, the complete braking system is free except for: Clubsprint where original mounting points must be used.
Time Attack Series Queensland
Street/Performance class - Must not have in cabin adjustable brake bias or aftermarket pedal box.
ROAD REGISTERED
NATIONAL CODE OF PRACTICE for LIGHT VEHICLE CONSTRUCTION and MODIFICATION SECTION LG BRAKES (https://infrastructure.gov.au/roads/vehicle_regulation/bulletin/pdf/NCOP5_Section_LG_Brakes_V2_01Jan2011.pdf)
1.2 MODIFICATIONS REQUIRING CERTIFICATION UNDER LG CODES
The following modifications may be performed under LG Codes:
Fitting disc or drum brakes that are not a manufacturer’s option;
Substituting brake master cylinders, wheel cylinders or calipers;
Fitting or modifying brake balance and pressure limiting devices; and
Relocating the brake pedal position for left hand or right hand drive.
-
madjak
- Racing Driver
- Posts: 1117
- Joined: Tue Dec 31, 2013 12:11 pm
- Vehicle: NA6
Re: Brake booster delete - mounting plate
Magpie wrote:World Time Attack:
E.10 BRAKES With the exception of computer controlled diagonal or transverse braking systems, which are not permitted in any class unless originally fitted, the complete braking system is free except for: Clubsprint where original mounting points must be used.
I think this would be fine for both options. The original mounting points are being used with no additional mounting holes required.
Magpie wrote:Time Attack Series Queensland
Street/Performance class - Must not have in cabin adjustable brake bias or aftermarket pedal box.
I think the adjustable dial could be removed for this series. I'm not sure if a reinforced / modified stock pedal box would count as aftermarket? Technically the clause isn't stopping you from installing a balance bar on a stock pedal box, nor modifying/removing the booster or masters, the question is if you can modify the stock pedal box or not. I would argue a few minor trims and braces isn't modifying the function of the original design. I think this one would need some clarification with scrutineers to be on the safe side.
Magpie wrote:ROAD REGISTERED
Basically no mods to the brake are allowed without engineering. Most of us would violate one point or another... mine is pretty much the entire braking system but them I'm not driving on the roads.
NA8: N/A 200whp | Haltech | Skunk2 Intake | S90 TB | RCP | 5 speed c/r dogbox | 4.78 diff | AST Shocks
Barbs L: 64.12 | S: 58.62 | Collie: 49.72
Barbs L: 64.12 | S: 58.62 | Collie: 49.72
-
Magpie
- Speed Racer
- Posts: 7468
- Joined: Fri Feb 11, 2011 12:49 pm
- Vehicle: NA6
- Location: Purga, QLD
Re: Brake booster delete - mounting plate
Anyway I'm still interested  I like the idea of the bias bar.
I agree it is not really a pedal box as it is only replacing 1 of 3 pedals.
I agree it is not really a pedal box as it is only replacing 1 of 3 pedals.
-
3gress
- Racing Driver
- Posts: 512
- Joined: Tue Apr 14, 2015 6:49 pm
- Vehicle: NA6
- Location: northern rivers n.s.w.
Re: Brake booster delete - mounting plate
Im still keen on the original master setup. Props for the food for thought in this thread.
-
madjak
- Racing Driver
- Posts: 1117
- Joined: Tue Dec 31, 2013 12:11 pm
- Vehicle: NA6
Re: Brake booster delete - mounting plate
I have a few concerns with just removing the booster without changing the pedal ratio enough. Whilst I have dríven the car with the booster disconnected and loved the feedback and feel, I was really stomping on the pedal to get effective braking. I think this works fine in my car as I have very large diameter brakes (11.75" F and 11.44" R) which means I have better than standard leverage. I also run pads that have a flat high friction coefficient that work from cold. If I was running my old Ferodo DS3000 pads I'm not sure how well the car would pull up on the first corner, as they hardly worked with a booster!
So I really think just a booster delete will not work for most of you. You will either need a smaller tandom master that replaces the stock one or we need to increase the ratio on the pedal a lot. Most my research points to a 6:1 - 7:1 pedal ratio required for a non-assisted pedal. It's currently 4:1 which means that the reduction in master cylinder sizing is so much that they end up not pushing enough fluid to work the brakes. So really we have to achieve this with mechanical leverage.
So to get the increased ratio, the clevis point must move up 32mm for 7:1 or 25mm for 6:1, probably somewhere in between would be best. Alternatively, the top pivot point of the pedal can drop however this requires modifying the pedal itself as well as new holes in the pedal box. Lifting the master exactly 30mm means that the stock master cylinder mounting points actually line up with the top pedal box mountings, so I think that's definitely the answer. It will mean trimming the top out of the pedal box a little to clear the rubber boot as well as drilling a new hole in the pedal, but other than that I think it's the best way to achieve the better ratio. There can be a little bit of adjustment to the hole up or down to fine tune the ratio as the pushrod can be on a slight angle (not too much though).
This means that the entire mod only requires one plate, 4 bolts and a new hole in the pedal. If anything, I think there might be a little too much leverage with this approach causing too much pedal travel but that's an easy fix with an upgrade the master to a Wilwood tandem 1" or 929 one if your cost adverse.
I'll design up a new plate. Who's keen to be the guinea pig?
NA8: N/A 200whp | Haltech | Skunk2 Intake | S90 TB | RCP | 5 speed c/r dogbox | 4.78 diff | AST Shocks
Barbs L: 64.12 | S: 58.62 | Collie: 49.72
Barbs L: 64.12 | S: 58.62 | Collie: 49.72
-
gslender

- Speed Racer
- Posts: 2330
- Joined: Sat Feb 19, 2011 10:49 pm
- Vehicle: NA6
- Location: Brisbane, QLD
Re: Brake booster delete - mounting plate
Sounds interesting.... I'm up for it and will doc with pics if you're willing!
Sent from my iPad using Tapatalk
Sent from my iPad using Tapatalk
MX5 91 NA6 LE completely stock and loving it!
MX5 92 NA8/ITBs Silver "aka Track Beeotch"
MX5 92 NA8/ITBs Silver "aka Track Beeotch"
-
madjak
- Racing Driver
- Posts: 1117
- Joined: Tue Dec 31, 2013 12:11 pm
- Vehicle: NA6
Re: Brake booster delete - mounting plate
Spent a couple of hours in the workshop tonight and got the dual masters set up. I haven't changed the pedal ratio yet but it will be done by dropping the top pivot down 25mm and shortening the top of the pedal. I'm thinking of trying it as is to see how much the pivot changes the pressure.
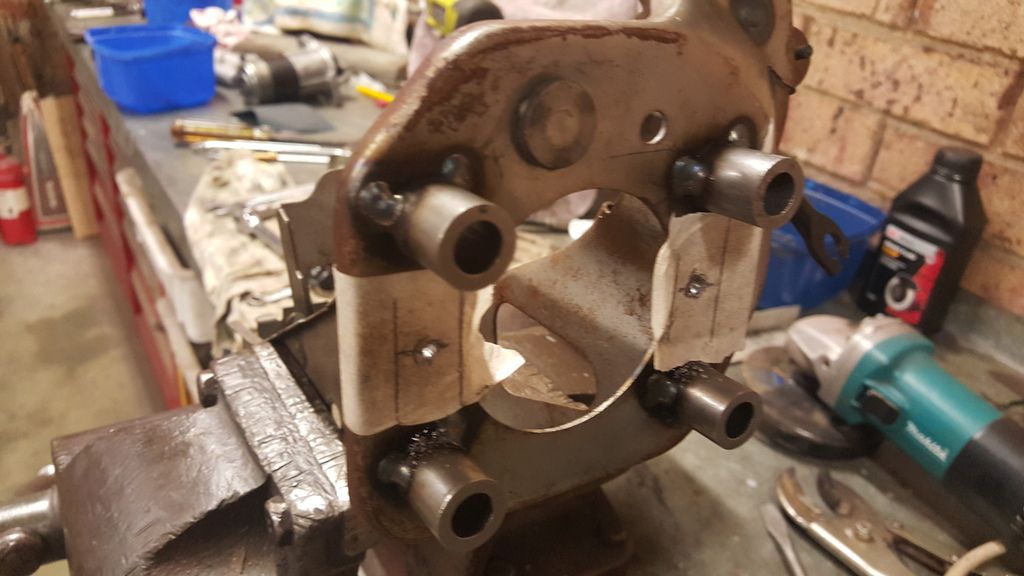
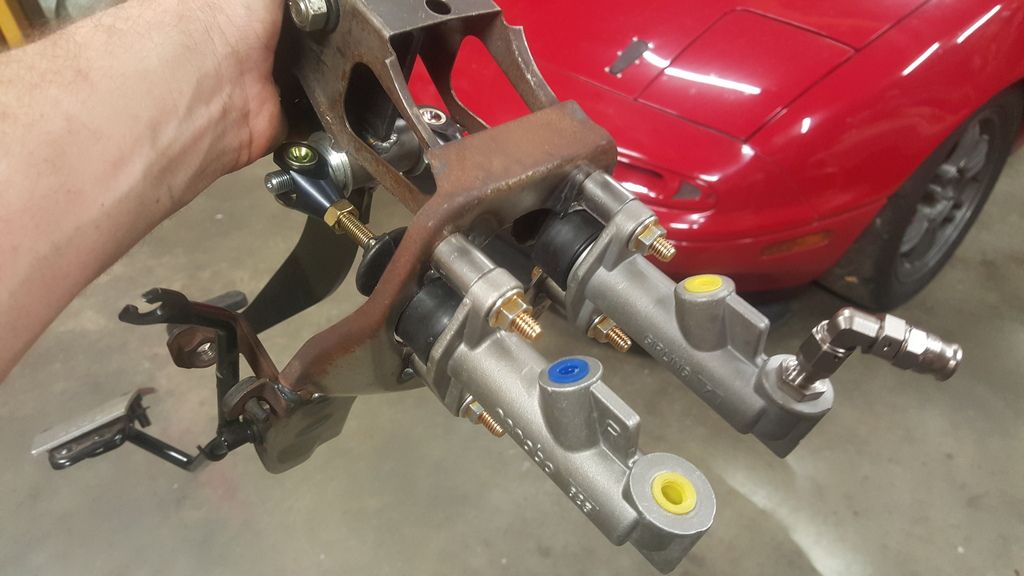
The movement is great... nice and smooth and will be easy to adjust the bias. I'll probably add some bracing on the sides where it has been trimmed but the firewall will hold it all together well and the top bolts to the chassis so I doubt its going to move at all.
Nice... very easy and should make for excellent brakes.
NA8: N/A 200whp | Haltech | Skunk2 Intake | S90 TB | RCP | 5 speed c/r dogbox | 4.78 diff | AST Shocks
Barbs L: 64.12 | S: 58.62 | Collie: 49.72
Barbs L: 64.12 | S: 58.62 | Collie: 49.72
-
plohl

- Racing Driver
- Posts: 1922
- Joined: Wed Oct 14, 2009 12:13 am
- Vehicle: NA8
- Location: Brisbane
Re: Brake booster delete - mounting plate
That's pretty cool!
Sent from my SM-N9005 using Tapatalk
Sent from my SM-N9005 using Tapatalk
Cheers,
plohl
plohl
-
madjak
- Racing Driver
- Posts: 1117
- Joined: Tue Dec 31, 2013 12:11 pm
- Vehicle: NA6
Re: Brake booster delete - mounting plate
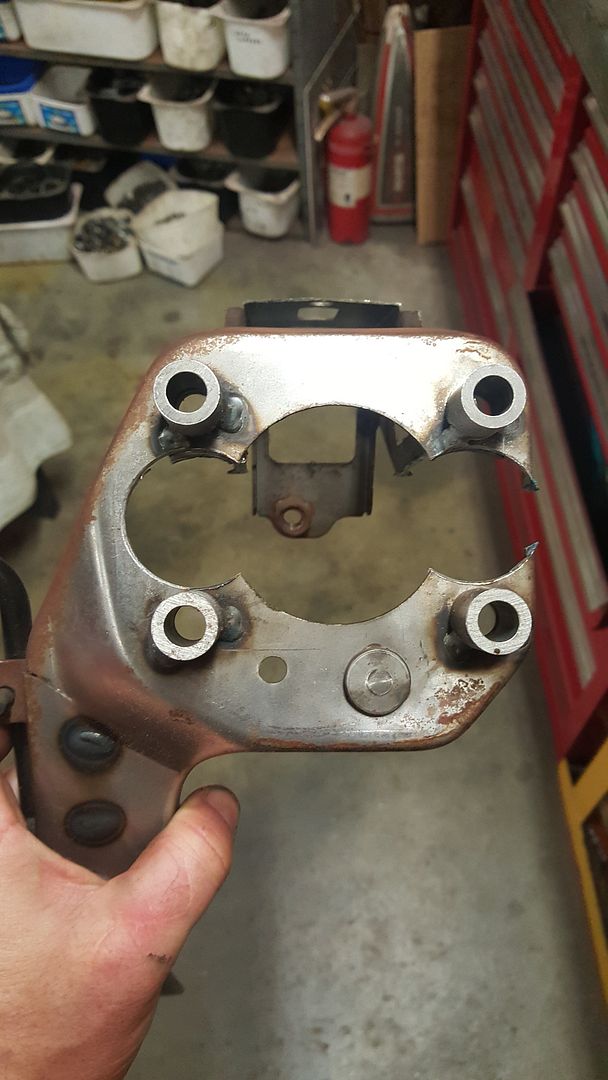
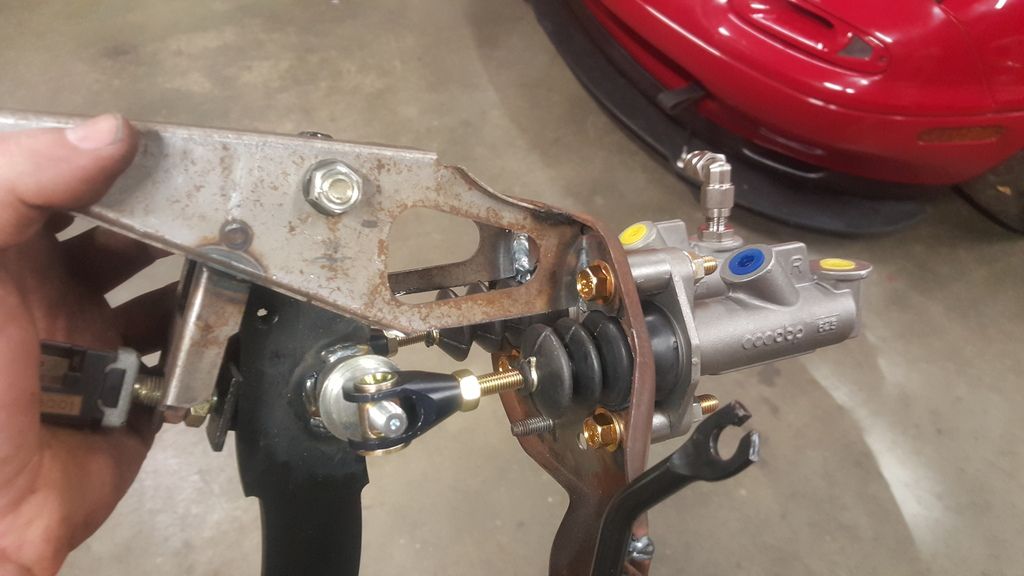
Brake pedal box and masters are all in position... just need to connect it all up to the brake lines now.
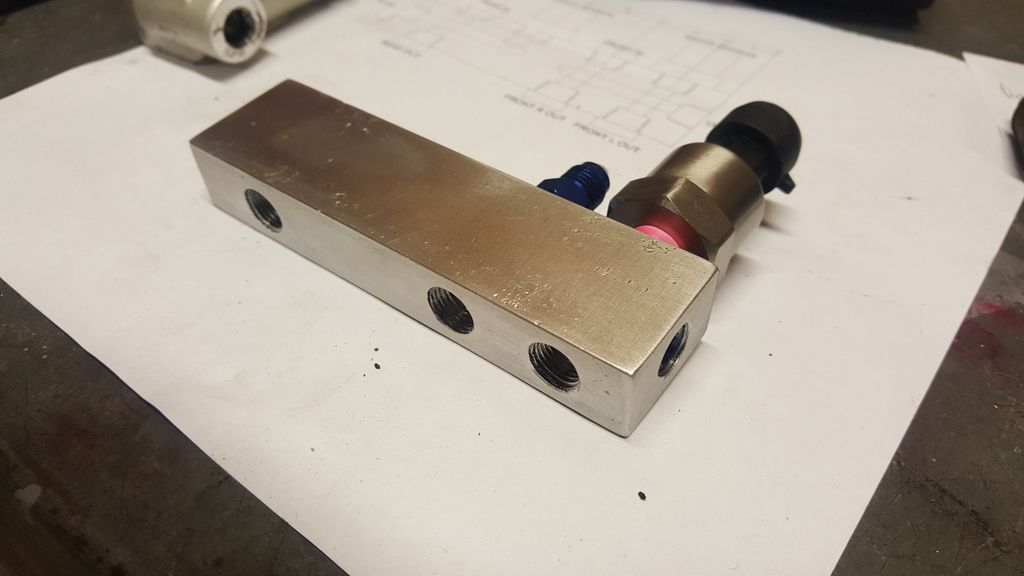
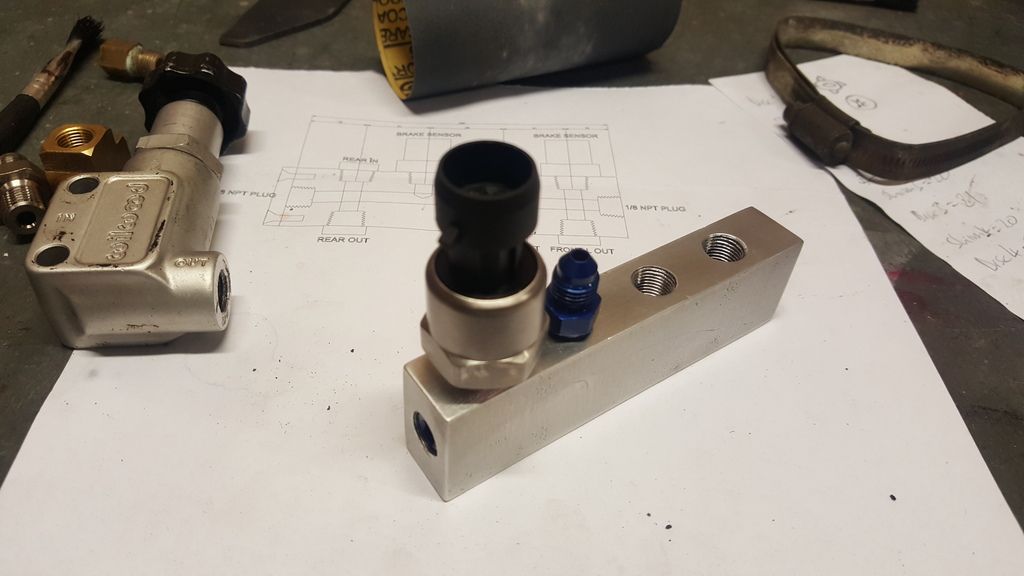
Here is my custom brake distribution block that I drilled and tapped. It has ports for input from master and brake pressure sensors on top and then outputs on the bottom to connect to the brake lines.
My phone battery died after taking these shots so I'll upload some photos of it all installed later today.
NA8: N/A 200whp | Haltech | Skunk2 Intake | S90 TB | RCP | 5 speed c/r dogbox | 4.78 diff | AST Shocks
Barbs L: 64.12 | S: 58.62 | Collie: 49.72
Barbs L: 64.12 | S: 58.62 | Collie: 49.72
-
madjak
- Racing Driver
- Posts: 1117
- Joined: Tue Dec 31, 2013 12:11 pm
- Vehicle: NA6
Re: Brake booster delete - mounting plate
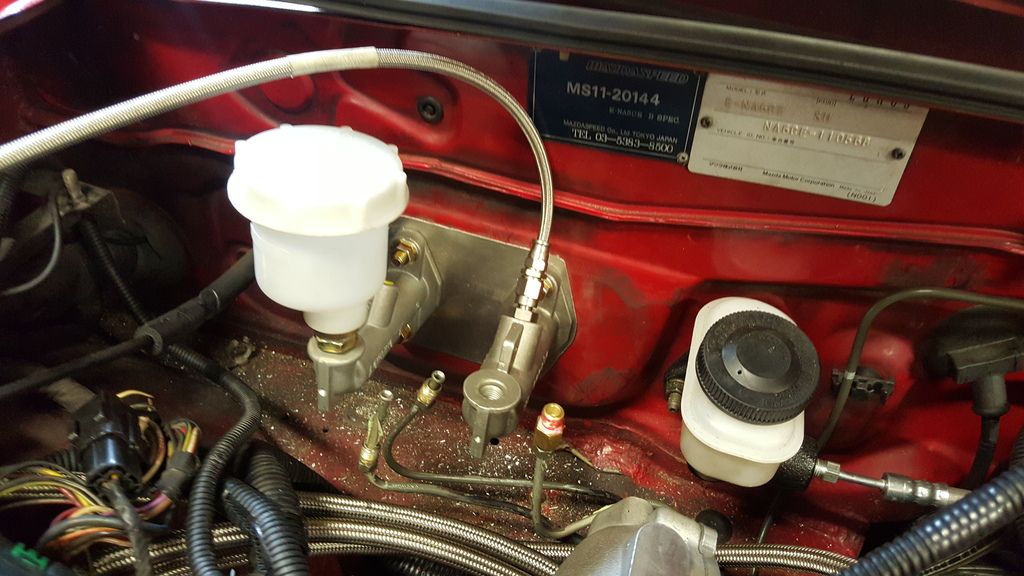
So much more room!
NA8: N/A 200whp | Haltech | Skunk2 Intake | S90 TB | RCP | 5 speed c/r dogbox | 4.78 diff | AST Shocks
Barbs L: 64.12 | S: 58.62 | Collie: 49.72
Barbs L: 64.12 | S: 58.62 | Collie: 49.72
-
orx626

- Forum sponsor
- Posts: 1774
- Joined: Thu Sep 23, 2004 8:26 am
- Vehicle: NC - Rotary
- Location: Brisbane - Northside
- Contact:
Re: Brake booster delete - mounting plate
This excites me! A well thought out and executed design/modification!! 
Well done madjak.
Well done madjak.
-
plohl
- Racing Driver
- Posts: 1922
- Joined: Wed Oct 14, 2009 12:13 am
- Vehicle: NA8
- Location: Brisbane
Re: Brake booster delete - mounting plate
Sick work dude! Keep us posted with how it goes
Sent from my SM-N9005 using Tapatalk
Sent from my SM-N9005 using Tapatalk
Cheers,
plohl
plohl
Return to “MX5 Wheels, Suspension, Brakes & Tyres”
Who is online
Users browsing this forum: No registered users and 0 guests


