The Roadster NA Journey Begins

Chat to do with your MX5/Miata/Eunos Garage Ride(s).

Moderators: timk, Stu, -alex, miata, StanTheMan, greenMachine, ManiacLachy, Daffy, zombie, Andrew, The American, Lokiel

User avatar
mrpham
Forum sponsor
Posts: 856
Joined: Tue Sep 20, 2011 8:42 pm
Vehicle: NA6
Location: Brisbane
Contact:

Re: RE: Re: The Roadster NA Journey Begins

Postby mrpham » Wed Mar 29, 2017 1:12 pm

Magpie wrote:It is worth it, if you are going to track the car. I should have done this a long time ago...

Maybe you could consider a remote brake booster so that your engine bay stays 'clean' but you still get the ease of 'boosted' brakes.

One day soon I'm installing a remote clutch reservoir, happy to give you some advance warning so you can have a look at my setup.

Yes the pedal pivot point does need to be modified.
ImageDSCN3693 by Eipeip, on Flickr


Only considering this so I can play around with my airbox designs and velocity stack lengths more. It'll never be a full on track car, I've made it too shiny.

When I first had the ITBs done, I drove the car for nearly a week without booster. I accidentally installed the check valve to booster in the wrong direction... Was a scary first drive, but just thought it was normal for ITB cars hahaha.

Also saw in your other thread someone posting about a smaller diameter booster too?

Clutch master and reservoir are not an issue with my filter/airbox, it's just the brake booster/master location now.

The 3d prototype airbox clears everything, but I want to see if I can improve on it.

Sent from my SM-G930F using Tapatalk
Current Forum Specials!

Frame Rail Braces - http://goo.gl/xJtRTs
COPs Bracket - http://goo.gl/sxJWhF

Build Thread - http://goo.gl/L3ZuKU

User avatar
StanTheMan
Forum legend
Posts: 6824
Joined: Thu Apr 24, 2003 11:00 am
Vehicle: NA6
Location: Balgowlah

Re: The Roadster NA Journey Begins

Postby StanTheMan » Wed Mar 29, 2017 1:18 pm

Imagine the bling.....converting those to braided AN lines & fittings....OMG!!!!!!
damm trouble is.....no one will ever see it. LOL
Satans Ride called F33nix the resurrected NA6

madjak
Racing Driver
Posts: 1117
Joined: Tue Dec 31, 2013 12:11 pm
Vehicle: NA6

Re: The Roadster NA Journey Begins

Postby madjak » Wed Mar 29, 2017 1:43 pm

Just mod your pedal box like I did. It's easy enough and you can run pretty much any master you want, and if you want some awesome bling in the engine bay, run the compact masters with remote reservoirs.

To work for a street car I would drop the top pivot of the pedal by 15-20mm and run 0.625" masters.
NA8: N/A 200whp | Haltech | Skunk2 Intake | S90 TB | RCP | 5 speed c/r dogbox | 4.78 diff | AST Shocks
Barbs L: 64.12 | S: 58.62 | Collie: 49.72

User avatar
mrpham
Forum sponsor
Posts: 856
Joined: Tue Sep 20, 2011 8:42 pm
Vehicle: NA6
Location: Brisbane
Contact:

Re: The Roadster NA Journey Begins

Postby mrpham » Wed Mar 29, 2017 1:56 pm

Its not so much about the bling, engine bay is clean as is. Just something compact so I have more room to test intake parts.

I like the idea of the tandem masters, assuming that would make it safer than the single output master? Mounting the masters in cabin like you and Magpie is also an option.

Did see your comments regarding pivot point and offsetting the master higher.

Sent from my SM-G930F using Tapatalk
Current Forum Specials!

Frame Rail Braces - http://goo.gl/xJtRTs
COPs Bracket - http://goo.gl/sxJWhF

Build Thread - http://goo.gl/L3ZuKU

Magpie
Speed Racer
Posts: 7468
Joined: Fri Feb 11, 2011 12:49 pm
Vehicle: NA6
Location: Purga, QLD

Re: The Roadster NA Journey Begins

Postby Magpie » Wed Mar 29, 2017 2:14 pm


User avatar
mrpham
Forum sponsor
Posts: 856
Joined: Tue Sep 20, 2011 8:42 pm
Vehicle: NA6
Location: Brisbane
Contact:

Re: The Roadster NA Journey Begins

Postby mrpham » Wed Mar 29, 2017 2:40 pm

Not even sure where I could fit a remote booster apart from where the current booster is, I'll look into that smaller diameter booster too.

Sorry for clogging your thread mate!

Sent from my SM-G930F using Tapatalk
Current Forum Specials!

Frame Rail Braces - http://goo.gl/xJtRTs
COPs Bracket - http://goo.gl/sxJWhF

Build Thread - http://goo.gl/L3ZuKU

Magpie
Speed Racer
Posts: 7468
Joined: Fri Feb 11, 2011 12:49 pm
Vehicle: NA6
Location: Purga, QLD

Re: The Roadster NA Journey Begins

Postby Magpie » Wed Mar 29, 2017 3:00 pm

No problem. You could mount it in the boot or inside the fenders.

madjak
Racing Driver
Posts: 1117
Joined: Tue Dec 31, 2013 12:11 pm
Vehicle: NA6

Re: The Roadster NA Journey Begins

Postby madjak » Wed Mar 29, 2017 3:55 pm

I have the stock pedal ratio and find with no booster brakes are fine once you get used to it. They do require more effort so for street driving increase the pedal ratio from 4:1 to 5.6:1.

In terms of master placement its easier to leave them in stock position and move the pedal pivot rather than offset the masters. The bolt holes of the masters in stock pisition align nicely with the mounting holes of the stock pedal box. This makes the whole setup nice and solid, although also a little tricky to install.
NA8: N/A 200whp | Haltech | Skunk2 Intake | S90 TB | RCP | 5 speed c/r dogbox | 4.78 diff | AST Shocks
Barbs L: 64.12 | S: 58.62 | Collie: 49.72

Magpie
Speed Racer
Posts: 7468
Joined: Fri Feb 11, 2011 12:49 pm
Vehicle: NA6
Location: Purga, QLD

Re: The Roadster NA Journey Begins

Postby Magpie » Wed Mar 29, 2017 4:12 pm

madjak wrote:They do require more effort
Have to agree here, you will adapt very quickly. I find no problem jumping from the MX5 to the Amarok.

It is a case of how hard you press and NOT how far the pedal travels.

YES I am a convert finally to removing the brake booster.

Magpie
Speed Racer
Posts: 7468
Joined: Fri Feb 11, 2011 12:49 pm
Vehicle: NA6
Location: Purga, QLD

Re: The Roadster NA Journey Begins

Postby Magpie » Sun Apr 02, 2017 7:31 pm

Spent a few days making some changes to the car after the recent day at Lakeside, including seeing if there was any damage after my excursion just before Eastern Loop.

Fuel Issues:
  1. Make more stable - changed the orifice size to next one. Have not tested under load but at idle and small revs it is more stable.
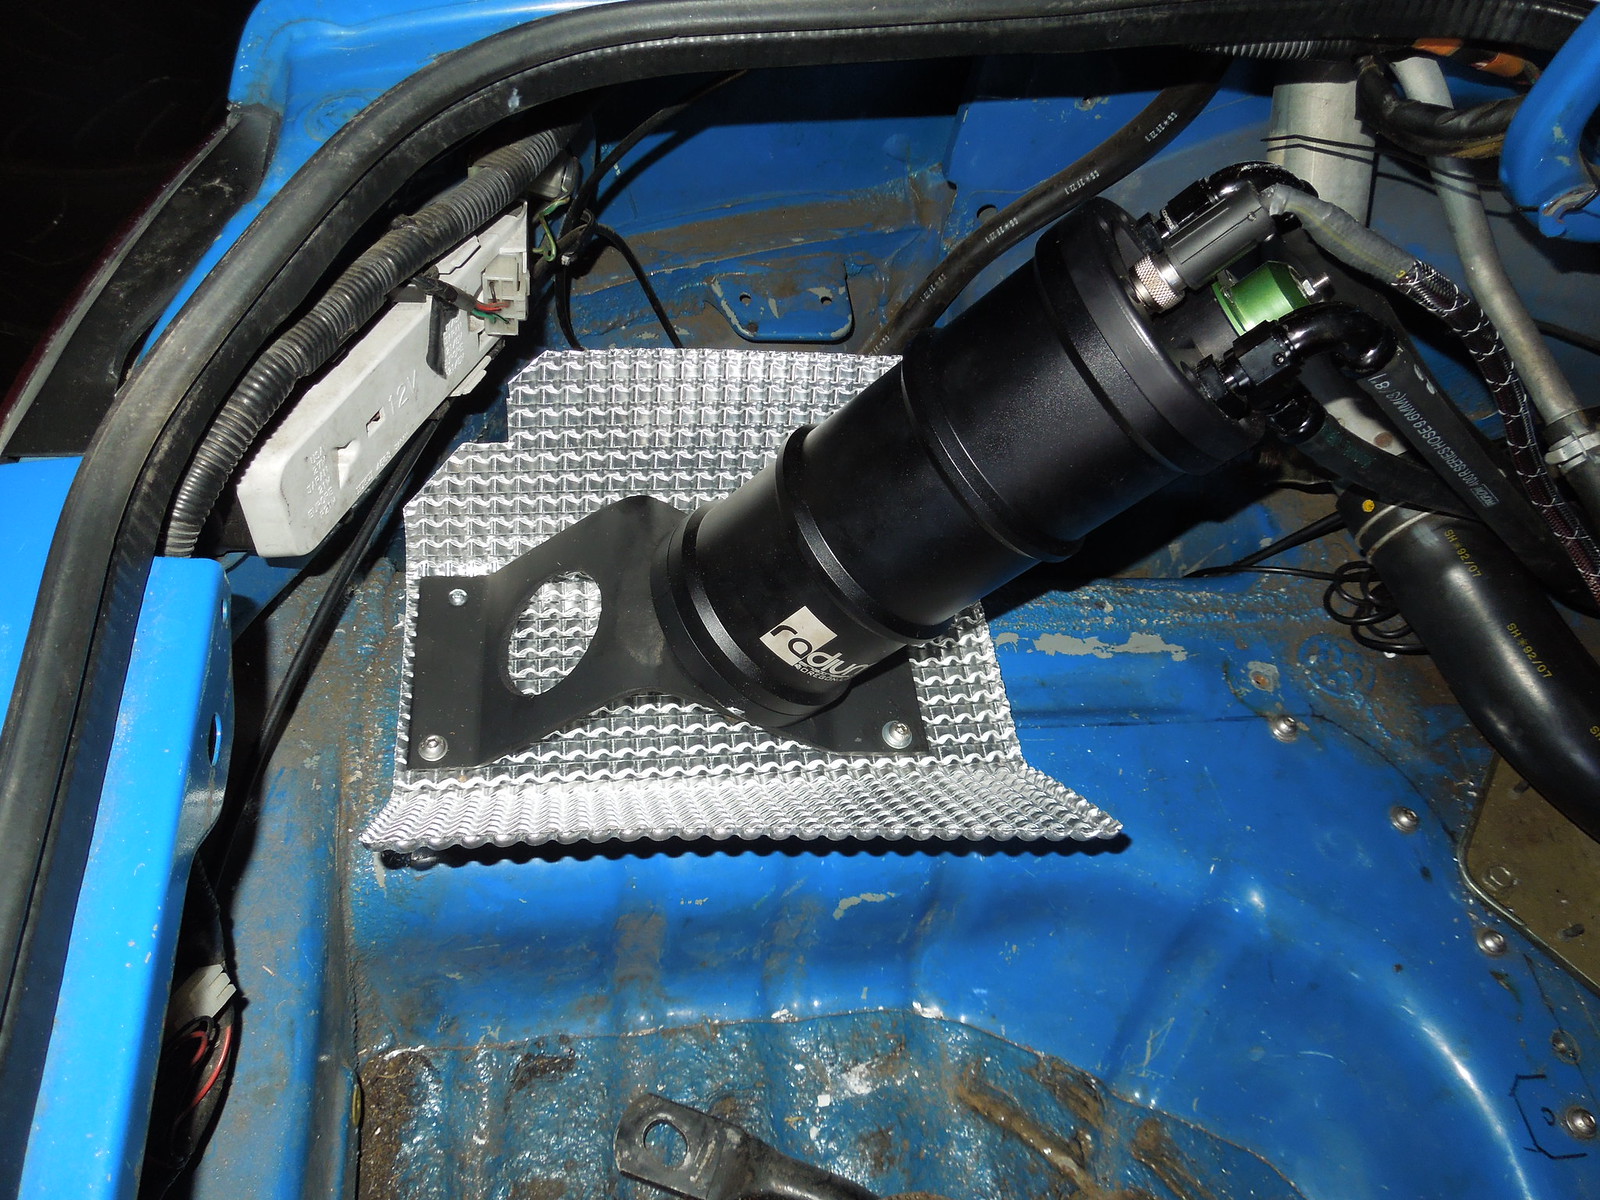
  2. Surge tank heat - at Lakeside the surge tank was almost too hot to touch. In general the boot was very hot as well.
    Solution 1
    Remount surge tank to give it some air circulation. Done...
    The bracket has also been coated in 'heat paint' then baked hard in the oven (as per the instructions). Also added some heat shield to stop some of the radiated heat.
    ImageDSCN4143 by Eipeip, on Flickr

    ImageDSCN4144 by Eipeip, on Flickr

    Install heat shield back under boot - done
    Also added an extra amount of heat sheilding. May eventually cover the entire boot area with heat sheilding (gold film).
    ImageDSCN4145 by Eipeip, on Flickr

    Solution 2
    Install SSR to control the fuel pump so at low RPM the pump just 'ticks' over. The PS1000 can be setup to control the fuel pump in this manner. Or just do not let the car idle for too long...

  3. Fix splitter - Done
    Again the monopan takes a hammering! Need to take it for an alignment just to see if it is all OK, however the out lap I did there was no handling issues.

    ImageDSCN4146 by Eipeip, on Flickr
  4. When I get back from NZ will take the car for a test drive. Front rotors also need to be replaced and the car washed.

Magpie
Speed Racer
Posts: 7468
Joined: Fri Feb 11, 2011 12:49 pm
Vehicle: NA6
Location: Purga, QLD

Re: The Roadster NA Journey Begins

Postby Magpie » Mon Apr 03, 2017 7:14 pm

WTAC 2017 Expression of interest submitted, now the wait begins...

Magpie
Speed Racer
Posts: 7468
Joined: Fri Feb 11, 2011 12:49 pm
Vehicle: NA6
Location: Purga, QLD

Re: The Roadster NA Journey Begins

Postby Magpie » Mon Apr 17, 2017 6:02 pm

Came back from NZ a bit earlier than planned and only got down to the shed today to tick off some of the jobs.ImageDSCN4147 by Eipeip, on Flickr

Rotors are still within tolerance, so they can stay, will check after Jap Nats.

Still planning on being able to attend Jap Nats so a few jobs to do to meet the rules...

In cabin brake adjustment - no
ImageDSCN4160 by Eipeip, on Flickr

No more in cabin brake adjustment
ImageDSCN4162 by Eipeip, on Flickr

Passenger seat - required
ImageDSCN4161 by Eipeip, on Flickr

Passenger seat - ticked
ImageDSCN4163 by Eipeip, on Flickr

Front headlight - broken. There is a very good reason that CAMS requires glass to be covered with contact
ImageDSCN4152 by Eipeip, on Flickr

ImageDSCN4153 by Eipeip, on Flickr

Of the 2 lights, this is the worst one to get out :(
ImageDSCN4148 by Eipeip, on Flickr

Clear contact put on new light
ImageDSCN4154 by Eipeip, on Flickr

Replacement light needed the slots in the Jetstream mounts to be adjusted...
ImageDSCN4157 by Eipeip, on Flickr

ImageDSCN4155 by Eipeip, on Flickr

Air die grinder later and a perfect fit
ImageDSCN4156 by Eipeip, on Flickr

Job done
ImageDSCN4159 by Eipeip, on Flickr

Still need to bend the fender back into shape after going backwards at Hungry
ImageDSCN4150 by Eipeip, on Flickr

User avatar
ManiacLachy
Engaged
Posts: 3307
Joined: Mon Jan 13, 2014 2:35 pm
Vehicle: NB SE
Location: Brisbane

Re: The Roadster NA Journey Begins

Postby ManiacLachy » Tue Apr 18, 2017 10:04 am

A productive day then! All I've done recently is replace brake light bulbs and a new battery, and a little on-going tuning. So envious of your shed!

Magpie
Speed Racer
Posts: 7468
Joined: Fri Feb 11, 2011 12:49 pm
Vehicle: NA6
Location: Purga, QLD

Re: The Roadster NA Journey Begins

Postby Magpie » Tue Apr 18, 2017 4:56 pm

Quick road test and the fuel pressure is a lot more stable with the next size up orifice. Only 5 more days of road testing available :(

Magpie
Speed Racer
Posts: 7468
Joined: Fri Feb 11, 2011 12:49 pm
Vehicle: NA6
Location: Purga, QLD

Re: The Roadster NA Journey Begins

Postby Magpie » Sat Apr 22, 2017 5:03 pm

Jap Nats done and dusted, finished second (yes there was more than 2 in the class).

Managed a PB on the Sprint 1:00.4829 however clubman time still needs some effort to improve it.... 1:04.4096. Peter Murray managed a 1:03.3531 on the clubsprint and 1:00.5378 sprint but was on A050's.

First session was horrible, no grip plus timer had a flat battery. After session 2 I set the tires to 33.5 hot and left them alone. Because of the class I was in I had to remove the knob for the brake basis, so made a few adjustments towards the rear and this made it worse, 3 full turns to towards the front and it was almost spot on! Had a ball playing with the 86 from Skid Control and a few other drivers. Again received some positive comments on the car so yes a great day. Number 1 pit crew was recovering from surgery so not many photos.

Fuel pressure was a lot better, still it is getting hot inside the surge tank, but no ECU limp mode incidents!

ImageDSCN4165 by Eipeip, on Flickr

ImageDSCN4166 by Eipeip, on Flickr

ImageDSCN4167 by Eipeip, on Flickr


Return to “MX5 Garage Chat”

Who is online

Users browsing this forum: No registered users and 4 guests